Train wreck F-20

RBSinTo

Senior Member
Joined
Jul 13, 2021
Messages
1,176
Reaction score
1,499
Location
Thornhill ( a suburb of Toronto), Ontario,
Guild Total
1
Wait, it gets better.
I discovered that Princess Auto, an automotive supply company here in Toronto has 8" deep throat C-clamps in stock for about $13.00 CDN each.
I drove over and checked them out.
Sure enough they have 8" and 12" deep C-clamps there, but they're made from cast iron or perhaps depleted Uranium, and weigh about ten lbs. each, and are far too awkward and thick for use on the guitar.
So I slunk out to my car, and all the way home heard the guitar gods still laughing till they cried.
I should have the Time Machine done by about Wednesday, and will then start on another easy one, the Cloak of Invisibility.
RBSinTo
 

Opsimath

Senior Member
Joined
Apr 20, 2015
Messages
4,679
Reaction score
4,241
Location
North Florida
Wait, it gets better.
I discovered that Princess Auto, an automotive supply company here in Toronto has 8" deep throat C-clamps in stock for about $13.00 CDN each.
I drove over and checked them out.
Sure enough they have 8" and 12" deep C-clamps there, but they're made from cast iron or perhaps depleted Uranium, and weigh about ten lbs. each, and are far too awkward and thick for use on the guitar.
So I slunk out to my car, and all the way home heard the guitar gods still laughing till they cried.
I should have the Time Machine done by about Wednesday, and will then start on another easy one, the Cloak of Invisibility.
RBSinTo
You could try a transport machine - transport to Harbor Freight, nab some clamps, transport back.

Seriously, friends help friends. I would ask my buddy for some assistance. Surely he knows you would help him out if he needed it, and maybe some day he will need you to lend a hand.

Good luck securing the tools you need. I hope it gets worked out. Looking forward to seeing how your guitar project progresses!
 

RBSinTo

Senior Member
Joined
Jul 13, 2021
Messages
1,176
Reaction score
1,499
Location
Thornhill ( a suburb of Toronto), Ontario,
Guild Total
1
This device from LMI would do the trick, and I would also expect them to ship to Canada. And it wouldn't be too hard to assemble yourself, if you prefer a DIY solution (after finishing the time-machine project, of course):

a simple & clever bridge clamp
Geoguy,
Thanks, but it won't work because this guitar has a Classical guitar bridge with string holes that run parallel to the surface of the sound box, so there is no way to secure it.
I made a bridge clamp like the one you suggested (copying its design from a Chinese one I saw on ebay), and used it a few years ago to successfully re-glue a bridge on a cheap no-name Dreadnought but can't use it for this project.
I'll figure it out.
RBSinTo
 

Nuuska

Enlightened Member
Joined
Jan 18, 2016
Messages
7,718
Reaction score
6,098
Location
Finland
Guild Total
9
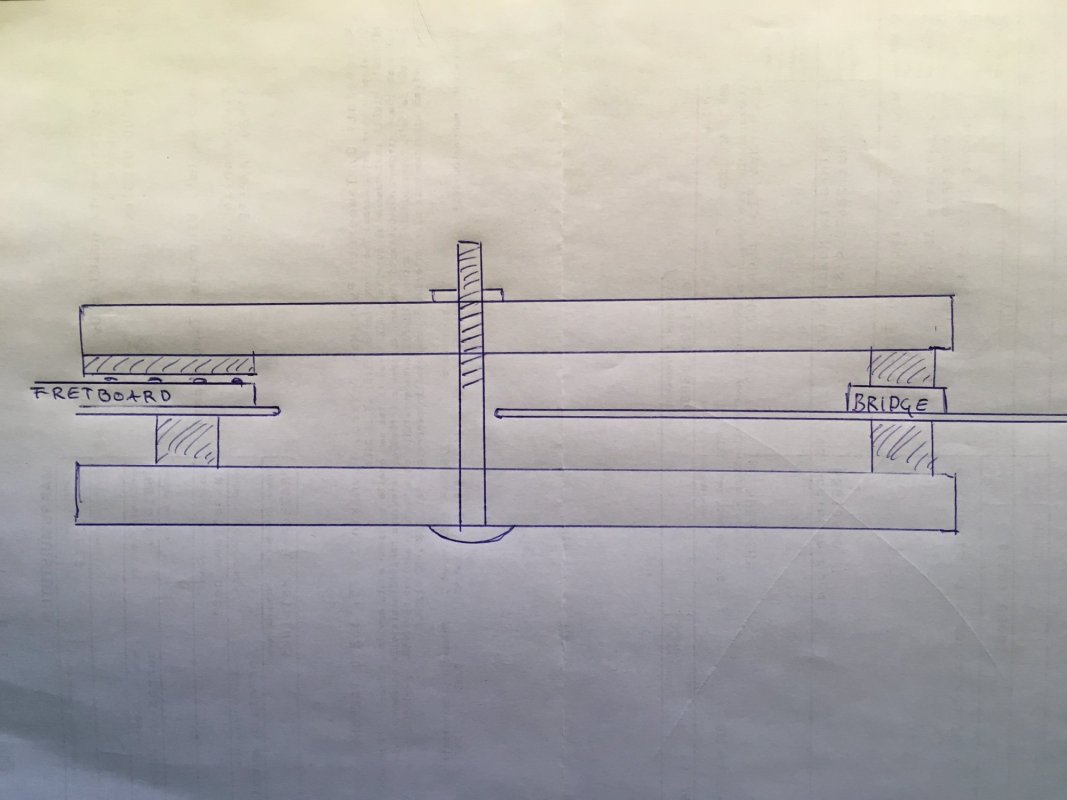
IMG_5213.jpg


You could try something like this - the shaded blocks need to be cut according to what's inside the guitar and to fit the bridge and fretboard shape. I did not draw the wingnut that you screw onto that bolt to tighten this contraption. Nor did I try to draw braces of the top etc.

Depending on project - I'd make two or three of them - birch, maple etc should make good beams.
 

wileypickett

Enlightened Member
Joined
Jun 18, 2009
Messages
5,014
Reaction score
4,581
Location
Cambridge, MA
Interesting solution Nuuska -- I've never come across one like this before. Can't see why it shouldn't work.
 

RBSinTo

Senior Member
Joined
Jul 13, 2021
Messages
1,176
Reaction score
1,499
Location
Thornhill ( a suburb of Toronto), Ontario,
Guild Total
1
Interesting solution Nuuska -- I've never come across one like this before. Can't see why it shouldn't work.
Nuuska,
Thanks for the drawing.
I used a similar jig years ago while repairing a hole in a hollow coat closet door.
Might try this if all other ideas don't work.
Another thought is to simply use a bungee cord or strap clamp wrapped around the sound box and over the saddle, and perhaps taped to the sides of it to prevent slippage.
Lots to think about.
RBSinTo
 

adorshki

Reverential Member
Joined
Aug 21, 2009
Messages
34,176
Reaction score
6,800
Location
Sillycon Valley CA
Nuuska,
Thanks for the drawing.
I used a similar jig years ago while repairing a hole in a hollow coat closet door.
Might try this if all other ideas don't work.
Another thought is to simply use a bungee cord or strap clamp wrapped around the sound box and over the saddle, and perhaps taped to the sides of it to prevent slippage.
Lots to think about.
RBSinTo
Think the point of the clamping pressure is to help ensure a strong glue joint. Would bungees exert enough pressure?
 

RBSinTo

Senior Member
Joined
Jul 13, 2021
Messages
1,176
Reaction score
1,499
Location
Thornhill ( a suburb of Toronto), Ontario,
Guild Total
1
Think the point of the clamping pressure is to help ensure a strong glue joint. Would bungees exert enough pressure?
Adorshki,
Good question. I suspect not as much pressure as clamps, but if I decide to use this method, I'll do a test gluing of a small piece of wood to a flat surface first to see if it is effective.
RBSinTo
 

davismanLV

Venerated Member
Joined
Mar 24, 2011
Messages
19,367
Reaction score
12,186
Location
U.S.A. : Nevada : Las Vegas
Guild Total
2
The point is to apply enough consistent pressure across the soundboard to make the bridge be ONE with the soundboard!! We all know stories of bridges coming off and lifting and such. But .... just glue the MF down.....

How you do it is gonna be a lesson to all of us. Keep us informed, my friend. (y)
 

RBSinTo

Senior Member
Joined
Jul 13, 2021
Messages
1,176
Reaction score
1,499
Location
Thornhill ( a suburb of Toronto), Ontario,
Guild Total
1
Discovered that the deep throat C-clamps clamps at Harbor Freight and Princess Auto are identical, so I bowed to the inevitable and took the kit over to the store and fooled with the clamps. The sound hole will accept two, so I bought a pair. For the center of the bridge, I'll use a heavy lead weight or bungee cord.
I want to get going on this thing, so keeping in mind that the assembly consists mainly of attaching the neck and bridge to the sound box, should I do the finish sanding, staining and protective coating before or after?
Anyone?
RBSinTo
 
Last edited:

davismanLV

Venerated Member
Joined
Mar 24, 2011
Messages
19,367
Reaction score
12,186
Location
U.S.A. : Nevada : Las Vegas
Guild Total
2
You can do either way. Guilds from Westerly for sure were finished after the neck was attached. They even lacquered OVER the pickguard!! But you can do it separately as well, just mask off any glued parts well. Doing it separately is good if you have to take the neck off later or do any adjustments. Either way. I'd probably do them separately. Also, if you glue the bridge first, then you just mask. But if you spray and finish first, you have to carefully mask off the footprint of the bridge before applying finish. Bridge is bare wood to bare wood. Others will chime in I'm sure....
 

geoguy

Senior Member
Joined
Mar 1, 2009
Messages
3,564
Reaction score
1,717
Location
metrowest MA
I would vote for finishing after assembly, because it might be tricky to leave the unfinished patch that Tom described above, in precisely the right spot.

RE: only two clamps, I would probably try to make a caul that fits between the clamps & top of the bridge, so that the two clamps effectively press down across the entire width of the bridge.
 

RBSinTo

Senior Member
Joined
Jul 13, 2021
Messages
1,176
Reaction score
1,499
Location
Thornhill ( a suburb of Toronto), Ontario,
Guild Total
1
You can do either way. Guilds from Westerly for sure were finished after the neck was attached. They even lacquered OVER the pickguard!! But you can do it separately as well, just mask off any glued parts well. Doing it separately is good if you have to take the neck off later or do any adjustments. Either way. I'd probably do them separately. Also, if you glue the bridge first, then you just mask. But if you spray and finish first, you have to carefully mask off the footprint of the bridge before applying finish. Bridge is bare wood to bare wood. Others will chime in I'm sure....
Tom,
Thanks for the advice.
By the way, I see you claim to have a Venerated Member. Besides you, who else venerates it??????
RBSinTo
 

RBSinTo

Senior Member
Joined
Jul 13, 2021
Messages
1,176
Reaction score
1,499
Location
Thornhill ( a suburb of Toronto), Ontario,
Guild Total
1
I would vote for finishing after assembly, because it might be tricky to leave the unfinished patch that Tom described above, in precisely the right spot.

RE: only two clamps, I would probably try to make a caul that fits between the clamps & top of the bridge, so that the two clamps effectively press down across the entire width of the bridge.
geoguy,
Thanks for the advice.
RBSinTo
 

davismanLV

Venerated Member
Joined
Mar 24, 2011
Messages
19,367
Reaction score
12,186
Location
U.S.A. : Nevada : Las Vegas
Guild Total
2
Tom,
Thanks for the advice.
By the way, I see you claim to have a Venerated Member. Besides you, who else venerates it??????
RBSinTo
Well, after GAD took over as our leader and the owner of the forum, he made lots of sorely needed changes and upgrades making life here a whole lot better for us. I think he came up with the classifications. It's based on number of posts so my verbosity, which is astounding, kicks me up a notch. Look at Al, he's a Reverential Member!! Mainly, it just means I have trouble shutting up, which I'm sure comes as no surprise to you. :ROFLMAO::LOL::p

Ooooops, I missed the JOKE!! LMFAO!! :LOL: :ROFLMAO::ROFLMAO:
 
Last edited:

chazmo

Super Moderator
Gold Supporting
Joined
Nov 7, 2007
Messages
26,180
Reaction score
7,566
Location
Central Massachusetts
Good luck, RBSinTo. Neat project.

Hey, Nuuska, I love your clamp idea. That looks like the perfect tool for a bridge glue-down!
 

adorshki

Reverential Member
Joined
Aug 21, 2009
Messages
34,176
Reaction score
6,800
Location
Sillycon Valley CA
Discovered that the deep throat C-clamps clamps at Harbor Freight and Princess Auto are identical, so I bowed to the inevitable and took the kit over to the store and fooled with the clamps. The sound hole will accept two, so I bought a pair. For the center of the bridge, I'll use a heavy lead weight or bungee cord.
Glad to see you clamps, because one other thing occurred to me:
The top's got very slight radius even classicals:
Common radii of classical guitarshttps://www.classicalguitardelcamp.com › ... › Luthiers

So using a bungee to press the bridge down on the top without any support underneath it could flatten the top somewhat. And if the top regains its radius after the bungee's removed, that might tend to make the ends of the bridge want to lift a bit if you get my drift?

I'm thinking clamps don't affect top radius because they don't function by pushing the bridge into the top as a bungee would.

Dunno, just thinking out loud here. I like to try to foresee all potential consequences of "doing something differently".

Ah, bet @AcornHouse would have some insight on it, he's a builder.

I want to get going on this thing, so keeping in mind that the assembly consists mainly of attaching the neck and bridge to the sound box, should I do the finish sanding, staining and protective coating before or after?
Anyone?
RBSinTo

I'd sand neck and body first (easier that way) bearing in mind you may need to do some touch up sanding after gluing. Then stain so that it's consistent from neck to body.
 

AcornHouse

Venerated Member
Joined
May 22, 2011
Messages
10,322
Reaction score
7,549
Location
Bidwell, OH
Guild Total
21
Glad to see you clamps, because one other thing occurred to me:
The top's got very slight radius even classicals:
Common radii of classical guitarshttps://www.classicalguitardelcamp.com › ... › Luthiers

So using a bungee to press the bridge down on the top without any support underneath it could flatten the top somewhat. And if the top regains its radius after the bungee's removed, that might tend to make the ends of the bridge want to lift a bit if you get my drift?

I'm thinking clamps don't affect top radius because they don't function by pushing the bridge into the top as a bungee would.

Dunno, just thinking out loud here. I like to try to foresee all potential consequences of "doing something differently".

Ah, bet @AcornHouse would have some insight on it, he's a builder.


Surprised @davismanLV didn't say something, but I'd do the sanding first (easier that way) bearing in mind you may need to do some touch up sanding after gluing. Then stain so that it's consistent from neck to body.
You want the bottom of the bridge to match the curve of the soundboard. You should never have to force the bridge and soundboard together. That’s a glue joint that is primed for failure. Some builders, using hot hide glue, don't even bother with clamps, they just use finger pressure to hold it for a couple of minutes while the glue sets up (the tricky part of working with hot hide glue; you don’t have much open time.)

Instead of weights or bungees or such, I’d suggest making a caul that contact the bridge at 3 points: the middle and the two ends. (And DEFINITELY use a caul inside the guitar!) Then you should have more than adequate clamping with your two deep reach clamps.
 
Top