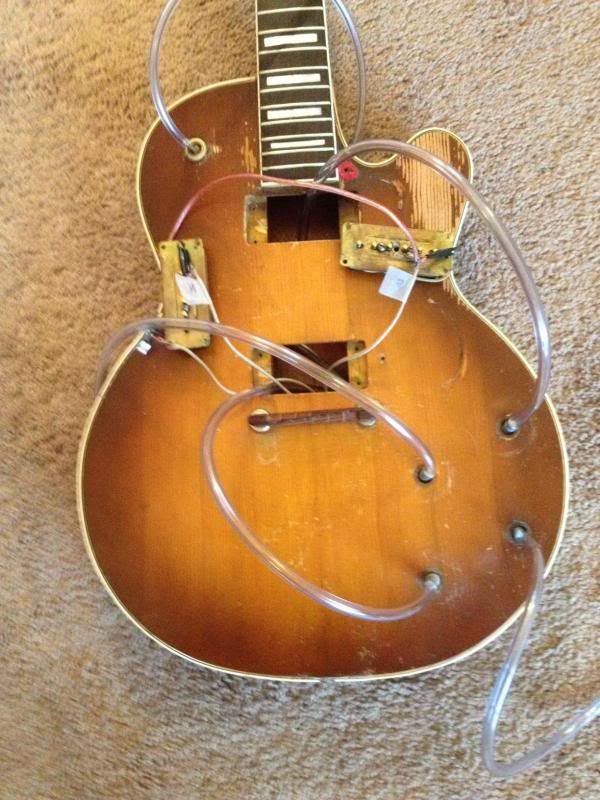
I took a few more pictures and added to the album as well as a video demonstrating the lack of magnetism with the bridge pick up.
I have been measuring the resistance with a cheap analog multi meter but wonder if I'm getting accurate readings since they are still wired up and not isolated from the rest of the harness. I touched at the connecting point of the pick ups as shown in one of the pictures and I'm getting about 6k on the bridge and about 5k on the neck. I'm getting really inconsistent and confusing readings on the pots. When turned all the way one way I get about 3k and all the way the other I get 0 and some where in between I get infinity. When I was playing the guitar before I think I remember them being weird but I was to distracted by the hum.
Questions:
Should I isolate the components to get a more accurate reading?
Do you think the pickups magnetism problems is an issue?
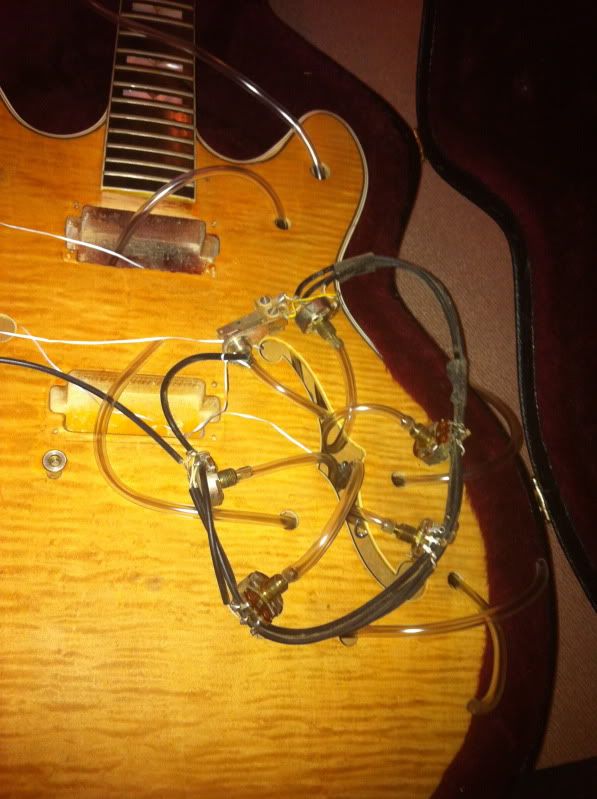
Do the pickups look like they have been potted?
Any other wise observations from the new pictures?
So my "guess" about the seafoam green capacitor was right. Is it a 0.047mfd as well? Was it between the neck p/u volume and tone pots?
If you compare your connections on the volume and tone pots to the pictures from fixit in that link, it should look the same, or? If yes, this should be o.k. at least.
The video shows it pretty good that the bridge pickup (the one with the hole) has an issue regarding no magnetism. I don't know what the reason could be and leave this to others who have a million times more experience with pickups to answer. I just checked two mini humbuckers that I have on my desk and both have about the same magnetism like your neck p/u.
My bridge p/u (the one with the hole) measures 6.95kohms and the neck p/u has 6.7kohms. But this is with the p/us desoldered from the circuit.
Not sure if you paid attention to the settings of the volume and tone pots when you measured the DC resistance of the pickups? With a multimeter you can easily measure it while still in the circuit by attaching the multimeter chords to the guitar chord output socket terminals, selecting one pickup with the switch, have all 4 vol & tone controls on max (means the knobs on 10 or all the way to the left = zero ohms) & then measuring. Afterwards selecting the other pickup with the switch. It'll read a few % less than if the p/u was out of the circuit but close enough for a basic indication if both are similar. Maybe you try this as well.
Inside, looking from both sides of the pickups, my p/us look the same like yours. There seems to be some kind of white wax (?) inside of them as standard as it looks.
Measuring the pots with a simple analog ohm meter will be difficult as they are 500kohms pots.
When you connect the left and the middle lug you should be able to move it slowly between zero ohm (pot all the way to the left) and infinity for a little time when you turn the pot towards the right.
The same happens when you connect the middle and the right lug, you will only measure zero ohms when the pot is all the way to the right this time, if you move it to the left very slowly the resistance will increase towards 500kohms (or infinity on your meter).
When you connect the left and right lug you will measure infinity or 500kohms, as your meter probably can't measure 500kohms.
(that video explains it on a 1kohms pot as example:
http://www.youtube.com/watch?v=Eh2cQCLie5A )
Ralf

") The wiring diagram, (courtesy of Ralph) is below.
The wiring diagram, (courtesy of Ralph) is below.
