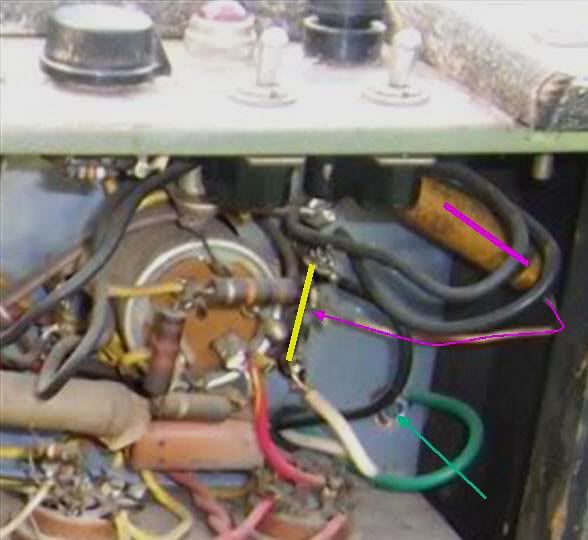
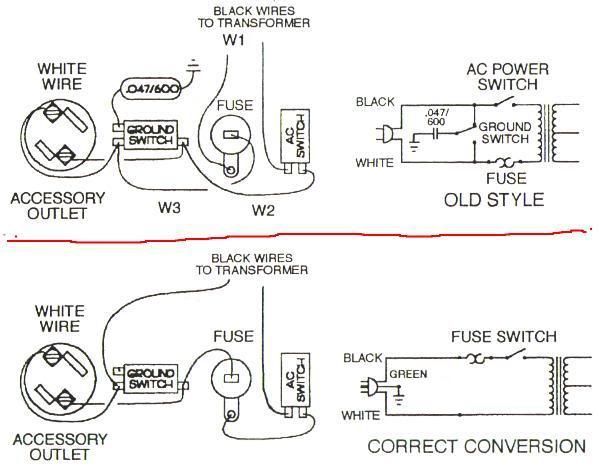
Hi Acorn House and congratulations on your new-to-you 99J! Tom has the layout pretty much right on. The pic below - from a 66J - if yours still has it's original can cap is what you are likely to see: there's a wiring strip (yellow line) adjacent to the butt of the can cap where the incoming power is terminated. This amp has a new 3-wire cord and you can see that the ground is terminated on a new screw into the chassis.
Otherwise, it's as Tom said; disconnect and reconnect black for black, white for white. The magenta line is a 110V line-to-ground 'death cap'; once the new cord is in, this goes before you turn the amp on. Were it to fail short, you'd be putting line voltage on the chassis :shock: :shock:
A couple of more points:
Strain relief: you can see that that new power cord comes in through a grommet; that's nice ... it keeps the edge of the metal from chafing the jacket ... but it will not prevent the cord from being yanked free in the event somebody stumbles over the cord or tips the amp over stressing it. The best practice here is to use a strain relief bushing that can be bought from anybody selling power cords.
The problem is that the hole is sized for a 2-wire cord and grommet - back in the day, the smaller diameter 2-wire cords typically had a knot tied in them on the component side of the chassis; good enough to prevent accidentally pulling the cord out. A new type SO or SJ 3-wire cord, including its jacket, is about the same size as the hole in the chassis; it might go through but:
- The 3-wire cord is too bulky ... there's not enough space to tie a knot in it and still keep it away from stuff that gets hot, and
- The hole isn't big enough to add a bushing which means drilling out the hole to something close to 5/8" diameter requiring a metal bit, a rat-tail file, or sacrificing a Dremel tapered reamer if you have one.
Everybody feels differently but I would not have left the amp in the pic in that condition; with a cord that could be accidentally pulled out.
DC voltage: everywhere you see a resistor on the bottom of the can cap you have DC voltage ... anything from 250V-400V of DC. That's enough to cause heart arrhythmia or stop your heart completely. If you're going to work in/around/near that cap, you have to discharge the voltage.
Best practice is to hold one lead of a low value/high wattage resistor ... 100 ohm/5 watt for example ... to each hot post while touching the other end to the chassis; hold the resistor there for 10-15 seconds, check with a meter for residual voltage, then do the next hot post. Alternatively, you can just short the cap sections out by touching the tip of a screwdriver with an insulated handle to each hot post while allowing the shaft of the screwdriver to touch the lip of the chassis; might get a big spark ... hold it there for a while, check the voltage with a meter.
Anyway; some of the ins and outs. If you don't want to fool with it, buy a cord and bushing on line and, like Tom suggested, let an electrician or even an appliance repairman do the change over. Good luck with your new amp!