1990s DeArmond Jetstar bass help

Joined
Jan 15, 2024
Messages
2
Reaction score
0
Guild Total
2
Hi all!

Newbie here, although I'm a Guild enthusiast (2017 SF V, 2019 F40 Jumbo).

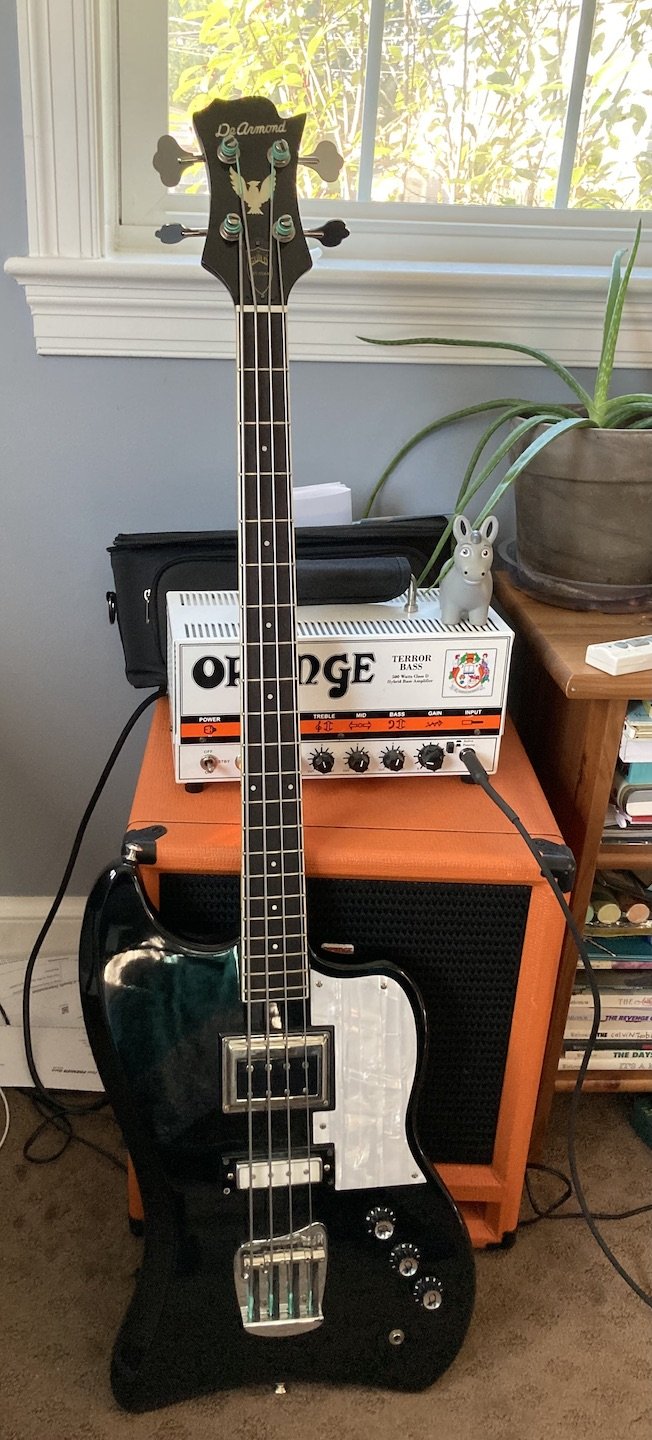
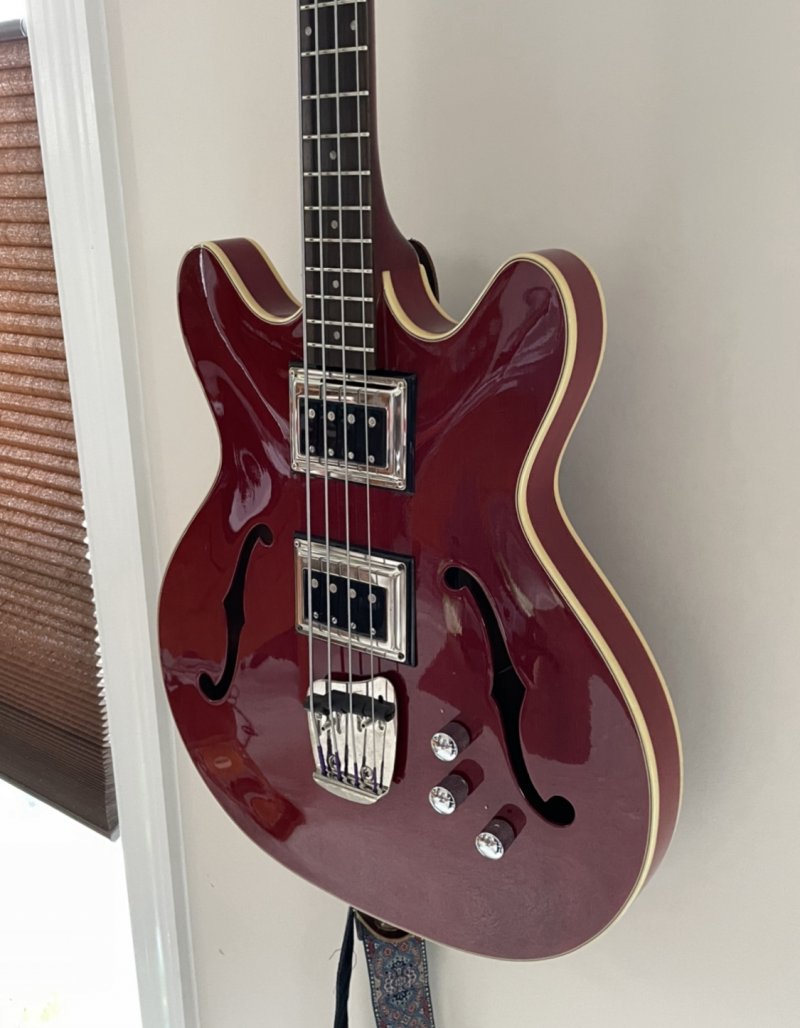
I bought this 90s JS bass in November, and would like to get some help figuring out some of the problematic wiring, and how the pots are currently working. As-is, I actually really the current tone. I mostly play indie rock, lots of pedals, etc., and the tone is dark and grindy in a pleasant way with the current flats. The controls seem odd to me, but I'm new to the JS and learning my way around them.

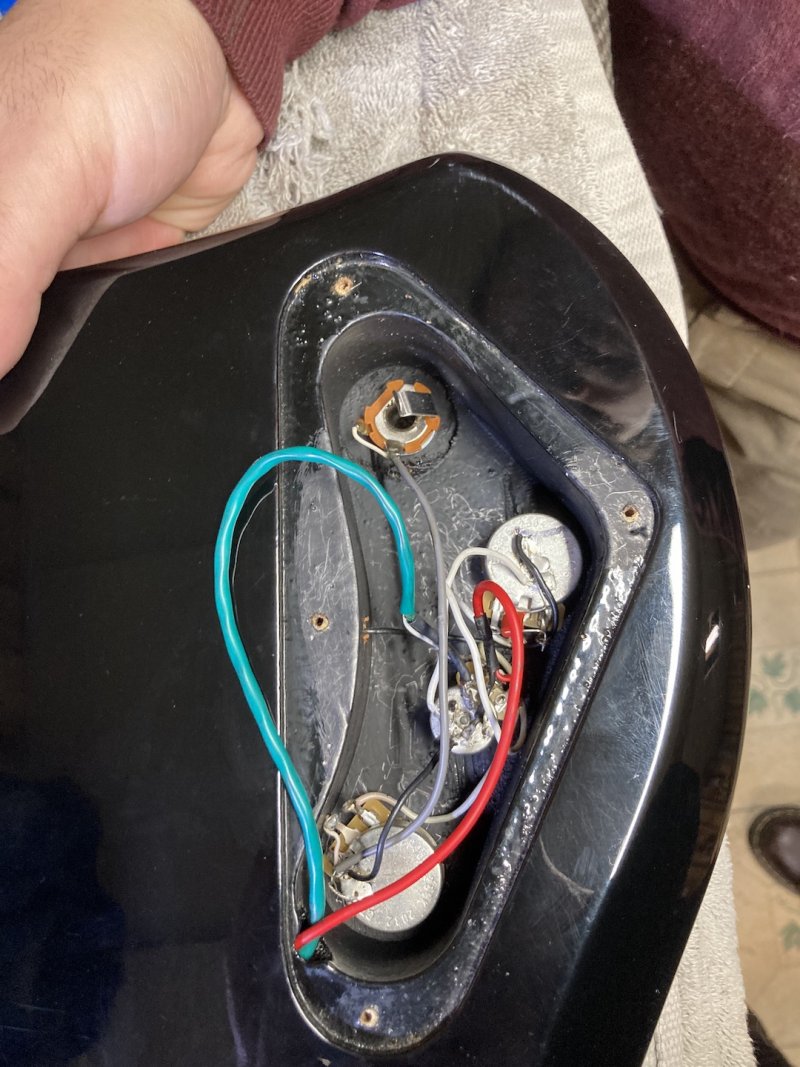
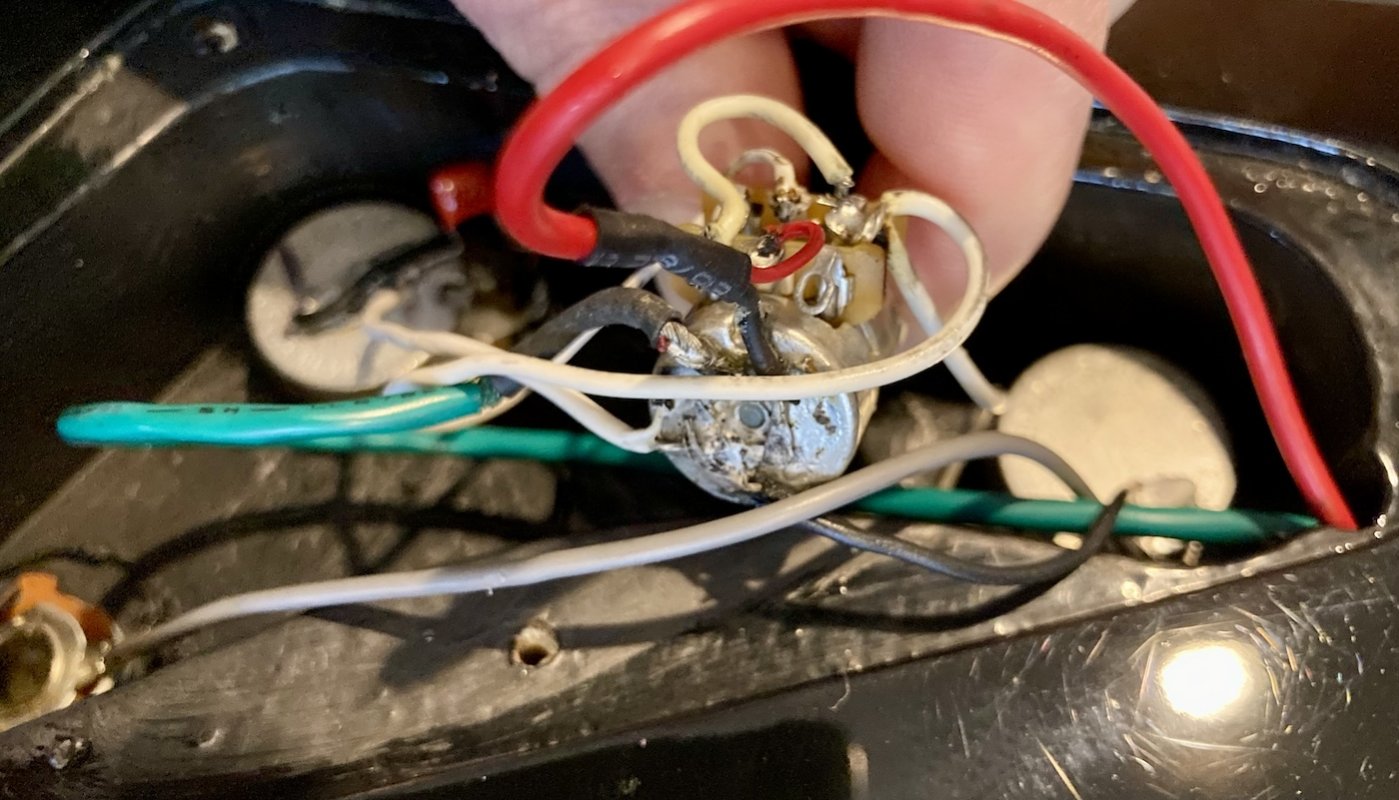
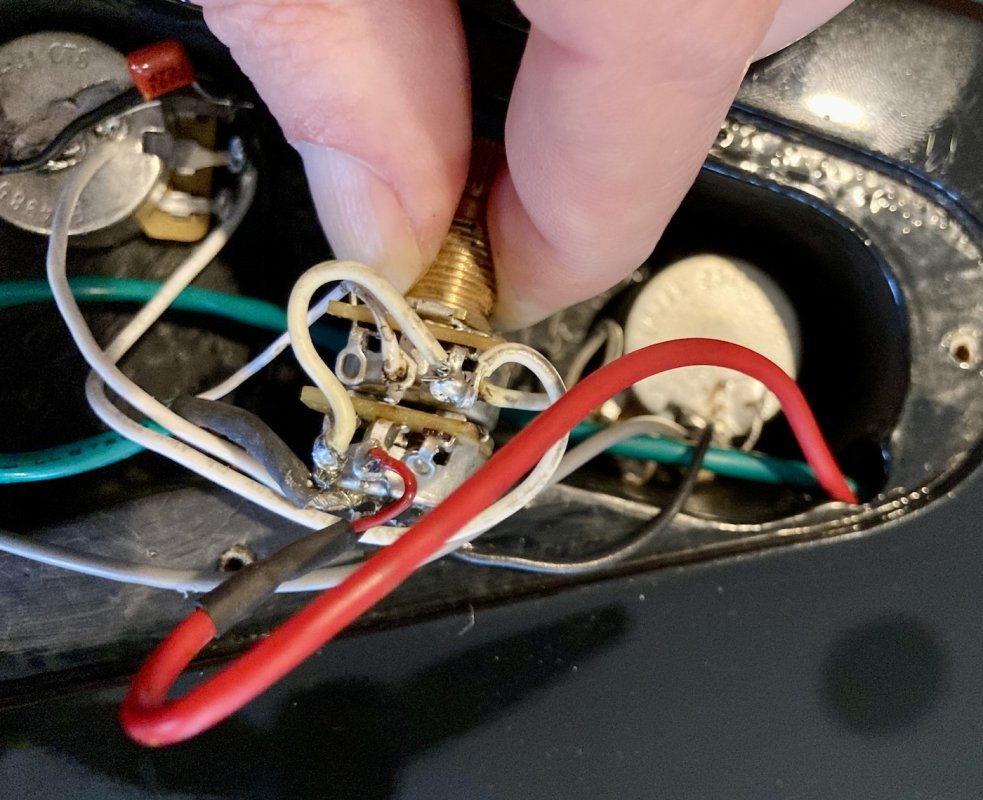
At present, the neck pot seems to control the bisonic pickup (or, just volume in general for whichever pickup) just fine. The middle pot is detented, and I can't tell if this is a blend, or if it is instead a tone pot. It only seems to work if it's cranked all the way dimed, otherwise it's shorted, and as I dial it back, I lose sound altogether. I assumed this was a tone pot based on the photos of the control cavity, but not sure now. And finally, I assumed the pot nearest the output jack was a volume pot, but when the middle pot is in that dimed position, this pot seems to be the tone pot.

After taking this to my tech for setup, he identified that the previous owner attempted to run the ground wire to the pickup ring on the BS, but it was detached. Also, he recommended I basically rewire this thing based on its current state, labeled a "hot mess". If I do so, I had assumed I'd gut it, shield the cavities, and go with e.g. a StewMac Jazz Bass wiring kit with 250K CTS pots and .047 capacitor, as the current pots are 250K CTS (and I like the tone for what is being output at present). But I also see that 500K for BS seem to be recommended frequently on here. What would be the good approach here?

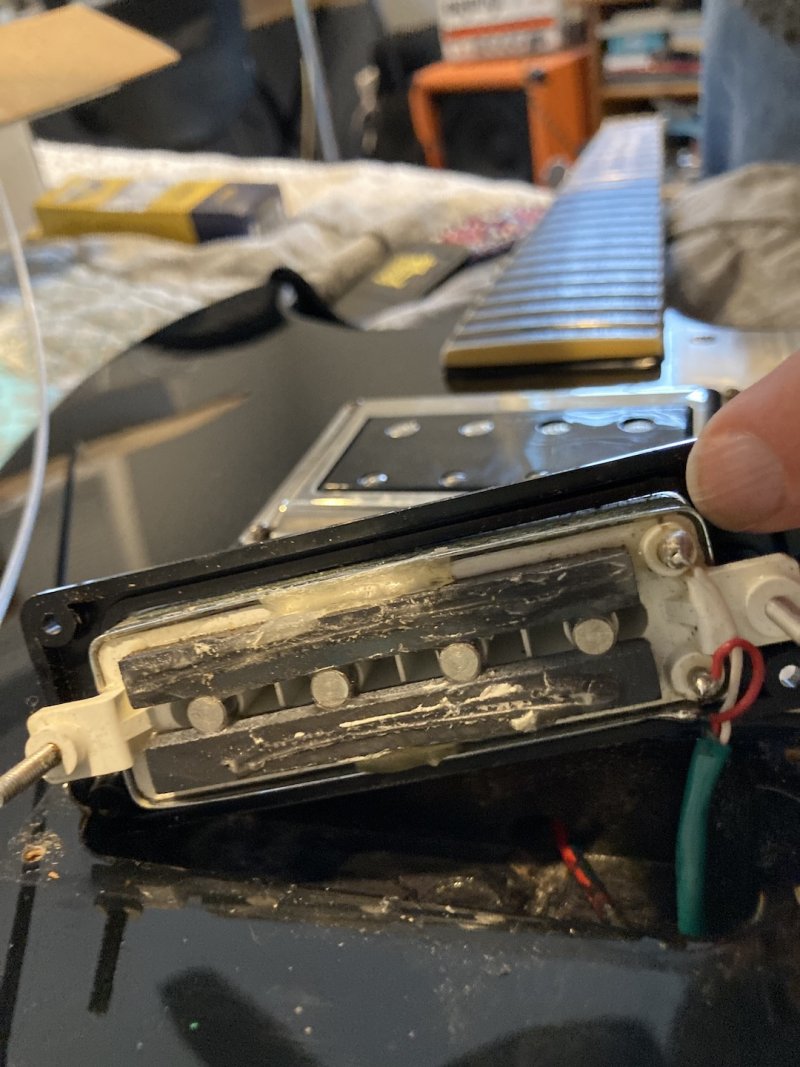
Can anyone help provide any info on the bridge pickup? I assume it's stock from the Korean build, but I see similar JS pickups currently on Reverb that are USA-made. At first I thought this was a Dynasonic, but now not sure. Is this P90-like?

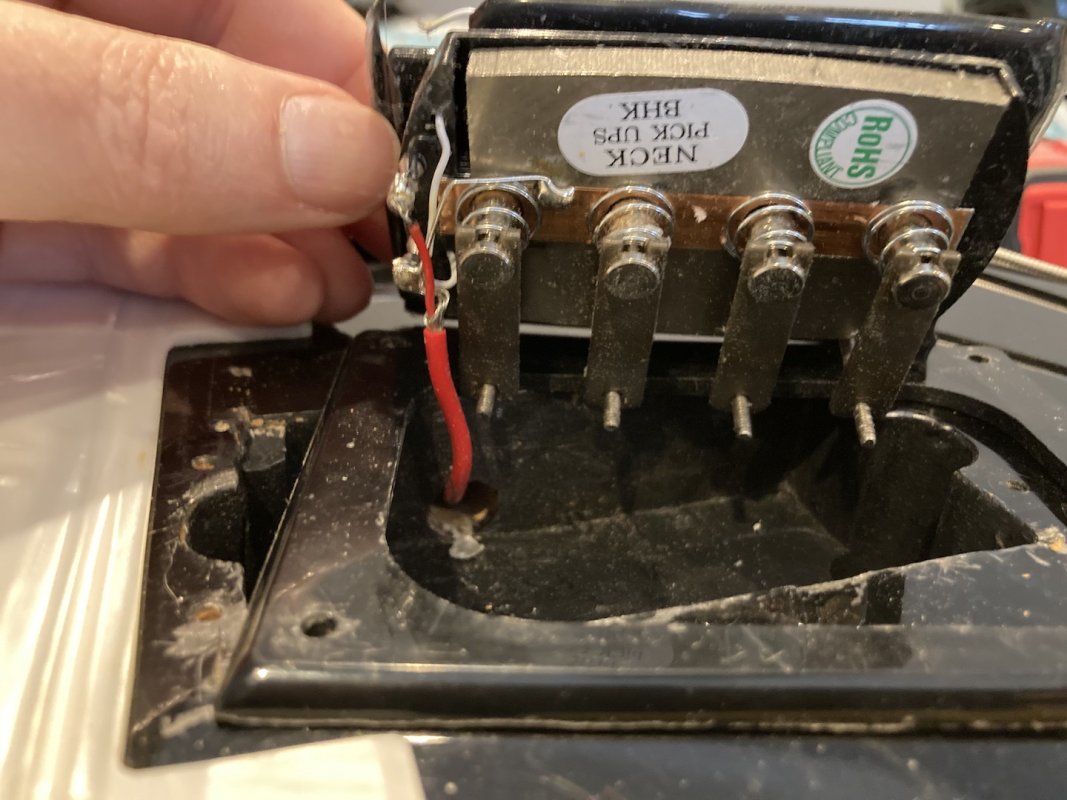
Also, would welcome any advice on cool upgrades for this one (the stickers on the back of this BS pickup seem to indicate a Korean BS pickup, but I'm potentially game to go Novak BS-DS on this one). I'd welcome replacement/upgrade ideas for the stock bridge pickup too, and I may be willling to just put an additional BS in it.

Finally, I'm really loving the flatwound strings that came on this bass, but have no idea what they are. They seem to have a baby blue/seafoam green wrap on them. Any ideas?

Thanks!
Cass
 

Attachments

  • IMG_5594 copy.jpeg
    IMG_5594 copy.jpeg
    308.1 KB · Views: 60
  • IMG_5651 copy.jpeg
    IMG_5651 copy.jpeg
    460.4 KB · Views: 51
  • IMG_5666 copy.jpeg
    IMG_5666 copy.jpeg
    400.9 KB · Views: 43
  • IMG_5668 copy.jpeg
    IMG_5668 copy.jpeg
    353.7 KB · Views: 53

mellowgerman

Senior Member
Joined
Sep 21, 2008
Messages
4,126
Reaction score
1,560
Location
Orlando, FL
Welcome! The bridge pickup is indeed a stock Dearmond pickup. The neck pickup is a Korean reissue Bisonic which replaced the original Dearmond neck pickup. The strings look like Fender flatwounds to me. If the ball ends at the bridge are colored different colors, that confirms the Fender hunch. The middle pot definitely was supposed to be a blend and it sounds like the Dearmond pickup was not connected correctly, the blend pot is defective/damaged, or the Dearmond pickup is dead. If you could take the knob off, loosen the washer, and remove the blend pot so we can clearly see the terminals and where all the wires are going, it would be much easier to diagnose potential issues. Also, make sure none of the terminals or bare wires are making contact with the cavity wall... it's possible there was shielding paint applied to the cavity, in which case any contact would cause a short. I also was thinking a possible short somewhere because you mention the tone is "dark" which is normally not a word I would associate with either of these pickups. They should be giving you a pretty clear, bright signal. A pickup in the neck position combined with worn-in flatwounds would of course tend to generate more bass response than a bridge pickup with roundwounds, but those Korean Bisonics are relatively bright in nature... so you might be losing some of your signal to a short or bad connection somewhere.

Otherwise, congrats on a cool little bass. Shouldn't be too difficult to diagnose and fix. Cheers!
 

lungimsam

Senior Member
Joined
Oct 1, 2011
Messages
2,618
Reaction score
1,673
Guild Total
2
What he said^^^^

Also, that middle lug of the volume pot is touching the sidewall of the cavity. If that wall is shielded then could cause a problem. Try loosening the pot mounting nut and rotating the pot lugs away from the wall and see if that changes anything. Easy first step to try before you go digging deeper.

If it was my bass, I would route and install for a Newark Street bridge Bisonic in the bridge position.
Also, Both 500k and 1MEG volume pots sound great with those Korean Bisonics. One of my Starfire basses is 1MEG and the other is 500k. They both sound great. So the only limitation is your imagination there!

Here is my three control volume/blend/tone harness for my Starfire bass with 2 Korean Bisonics:

CTS 1MG audio taper volume pot(CTS-EP-4988)/CTS 500k Blend pot (CTS-EP-6386)/Stellartone Tonestyler instead of a tone pot.

(Could also use a Bourns 500k blend pot PDB182-GTRB-2504) if you can’t get the CtS pot listed above.

I can post my chicken scratch wiring diagram if you like too if you want to see how it is wired if I can find it.

Alsoooo, here’s some info on type of blend pot to use for these applications that was furnished to me from Stellartone:
Note that proper operation requires a 500k/500k ohm MONO BLEND POT [such as the models I listed above]
Don't use a 250k/250k... and never use a STEREO PAN POT! The latter type never reaches zero ohms = full volume to both pickups, when set in the center detent.”

More info on how I converted this Starfire I to a Starfire II, the harness, and plenty of info on blend pots including valuable no load blend pot converting knowledge here:
 

Attachments

  • IMG_3742.jpeg
    IMG_3742.jpeg
    969.1 KB · Views: 22
Last edited:
Joined
Jan 15, 2024
Messages
2
Reaction score
0
Guild Total
2
Hello all,

Thank you very much mellowgerman and lungimsam for the helpful advice you've given.

I just wanted to post the follow-up pictures you requested, to show the lug terminals on the blend pot. Hopefully these are clear enough, if not I can try to capture anything else.

Thanks,
Cass
 

Attachments

  • IMG_5672.jpg
    IMG_5672.jpg
    423.9 KB · Views: 29
  • IMG_5673.jpg
    IMG_5673.jpg
    593.3 KB · Views: 34

mellowgerman

Senior Member
Joined
Sep 21, 2008
Messages
4,126
Reaction score
1,560
Location
Orlando, FL
Sorry for the delay, it's been a wild week! In any case, those are some pretty gnarly looking soldering joints. Particularly the top center lug, the bridge pickup hot/signal lead connection... which probably explains why you're not getting any signal from that pickup. Also though, it looks like you have two unused lugs on that blend pot that should actually be your connections to ground.
Assuming it's a standard functioning blend pot (which it looks to be) all 6 lugs should be in use.

1706233797876.png

I don't know if you have a soldering iron or any experience using one, but if you do (or have a friend or family member who does and would be willing to help), it would be worth attempting to re-do the bridge pickup hot/signal lead connection on that top middle lug ("Source A" in the diagram). Then run another wire from ground to one unused lug, then from there another little jumper to the other unused lug. If your blend pot still functions internally, those steps should get it working... worst case scenario, it's unsuccessful and you take it to your tech to rewire. Those pots are not valuable or rare components, so I'd say it's worth a careful DIY experiment.
 
Last edited:

Happy Face

Justified Ancient of MuMu
Joined
Dec 11, 2007
Messages
921
Reaction score
244
Impatient soldering is an affliction to be avoided. Get everything really hot. I always rushed things and then had to waste three times as long to reheat and remove excess solder which is MUCH more difficult to do well than just doing it right the first time. Especially on a pcb.

Tomorrow I get to deal with another great nemesis of my musical life: tracking down the source of a hum somewhere in the wiring in the synth rig I am very, very slowly resurrecting.
 

GAD

Reverential Morlock
Über-Morlock
Joined
Feb 11, 2009
Messages
23,073
Reaction score
18,724
Location
NJ (The nice part)
Guild Total
112
Impatient soldering is an affliction to be avoided. Get everything really hot. I always rushed things and then had to waste three times as long to reheat and remove excess solder which is MUCH more difficult to do well than just doing it right the first time. Especially on a pcb.

Be careful because "get everything really hot" can lead to destroying components.

The trick is to get what needs to be soldered hot *quickly* while heating anything else (sometimes including other parts of the same component) as little as possible. In order to do this on something like a potentiometer of the type used in guitars and amps, you need an iron with good thermal mass and the ability to deliver heat quickly. Pencil irons are rarely if ever capable of this - especially ones with pencil-type tips. Here's a vid I did a couple of years ago to show how quickly a good station (Pace ADS200) with a big tip can melt the solder on a pot in a guitar:


Happy Face

Justified Ancient of MuMu
Joined
Dec 11, 2007
Messages
921
Reaction score
244
Be careful because "get everything really hot" can lead to destroying components.

The trick is to get what needs to be soldered hot *quickly* while heating anything else (sometimes including other parts of the same component) as little as possible. In order to do this on something like a potentiometer of the type used in guitars and amps, you need an iron with good thermal mass and the ability to deliver heat quickly. Pencil irons are rarely if ever capable of this - especially ones with pencil-type tips. Here's a vid I did a couple of years ago to show how quickly a good station (Pace ADS200) with a big tip can melt the solder on a pot in a guitar:


Points well taken there. Thanks.
 

lungimsam

Senior Member
Joined
Oct 1, 2011
Messages
2,618
Reaction score
1,673
Guild Total
2
Soldering guitar/bass components is fun and easy when you get the hang of it. Plus you can swap out components whenever you like and not have to schlep to a repairman.
Tip: Use a mini metal alligator clip as a heat sink to avoid overheating areas you don’t want heated.
For instance:
If you are soldering a wire to a pot lug, put the alligator clip on the lug arm so you don’t overheat stuff going into the pot. Same with a cap. When you solder the cap wire to a pot lug, put the clip on the side of the cap wire that leads to the cap to divert the heat away from the cap.
When you get better at soldering you won’t need the clips as much. You’ll be in and outta there quicker.
 

Happy Face

Justified Ancient of MuMu
Joined
Dec 11, 2007
Messages
921
Reaction score
244
My view of this is the result of countless frustrating hours locating and remedying cold solders. But that was mostly in P2P radios and amps I was building as a teen.
 
Top