The $325 setup, or Post-holiday tune-ups chapter 1...

GardMan

Enlightened Member
Joined
Jun 5, 2006
Messages
5,370
Reaction score
979
Location
Utah
Guild Total
5
For more than a year I have contemplated getting the tools and learning to "set up" my Guilds to my own preferences. Each time I'd look thru the StewMac catalog at the various things I might need, cogitate for a while, and then put it off...

Finally, just before the holidays, I decided I needed to follow thru... my D-50 was in dire need of a new nut and saddle, to correct a string spacing issue and poorly angled bearing surface on the saddle. So, I ordered a vise, nut shaping files, a nut seating file, nut slot files, a string lifter, micro chisels, and four nut blanks from StewMac, and four compensated bone saddles from Bob Colosi (I wasn't ready to make my own compensated saddles yet).

Over the last two weekends, I have spending my free time sanding, fitting, re-stringing, etc... Although my D-50 was the incentive to try my hand at nut making, I decided to practice first on my D-25. The scariest part was using a hammer and wood block to break out the old nut... turns out it was plastic... I wonder if it was the original from Guild? I also was surprised to find the saddle on the D-25 was Tusq... I remember trying Tusq in several of my dreads 4 years ago, but thought I had replaced them all with bone already.

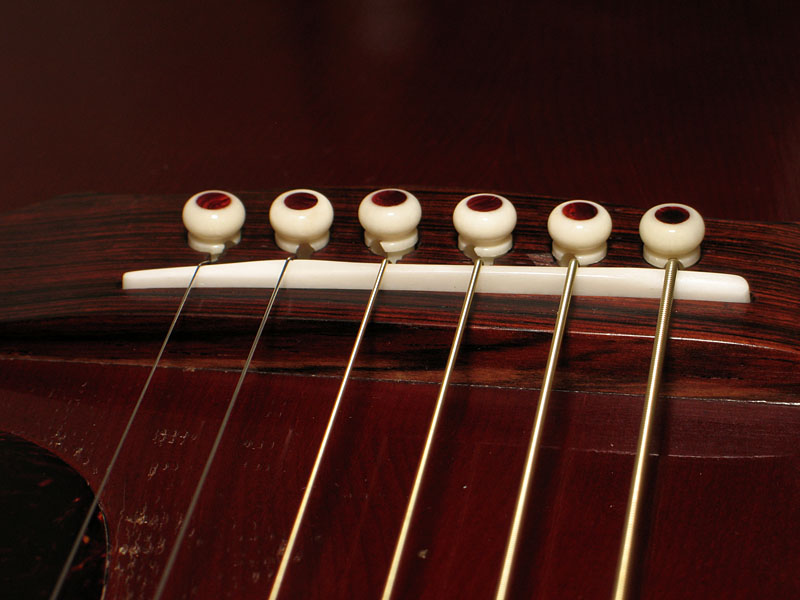
Fitting a Colosi saddle (I have now installed 3, on the D-25, D-55, and D-50) takes me about 60-90 minutes of sanding and fitting, making sure that the width and length are just right, and then test fitting several times to get the height/action where I want them (note... altho' it looks higher under the B string, that's just an illusion from perspective and the compensation):
132043258.jpg


Nut making was a little more time consuming and nerve wracking. Despite measuring three times, I got the string spacing wrong on my first attempt last weekend (too narrow by 1 mm). More succesful today... not perfectly shaped, but very useable (shown with the old nut):
132043257.jpg


I spent quite some time getting the string height where I want it... for each string I'd take 6-8 strokes with the file, then replace the string and test the height. Feels pretty good right now. Next week, I'll tackle the nut on the D-50. Again, the scariest part will be banging out the old nut. I also have one more Colosi saddle, slated to go into my D-46. In the end, most of the $325 I spent was in tools (several of which I probably didn't really need), and $80 (plus shipping) for four shaped saddles. I figure I'll break even on the tools with ~ 3 complete setups (nuts and saddles)... so one more after I finish the D-50. But, I didn't do it for economy... there's a certain satisfaction in being able to set up my Guilds the way I want them.

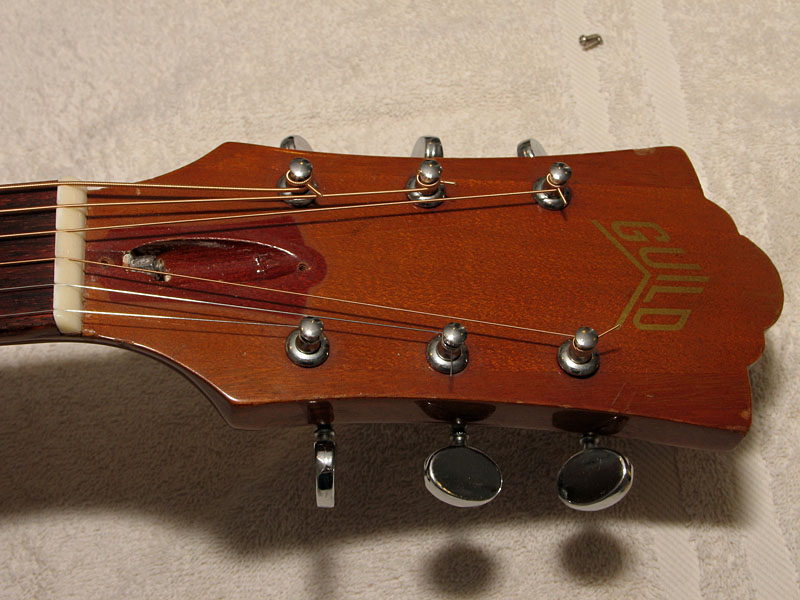
One last photo... while re-stringing the D-35, I pulled off the TRC and took a photo to show how much the headstock has faded in nearly 40 years. The patch under the TRC is the original color:
132043259.jpg
 

capnjuan

Gone But Not Forgotten
Joined
Nov 29, 2006
Messages
12,952
Reaction score
4
Location
FL
Thanks Dave; really good stuff and shows what any of us ought to be able to do with some initiative ... initiative I lacked a few years ago. I had a '66 F212 that had a nut that had been mis-cut a long time ago; don't know whether it was original or not but the E and B pairs were bunched and pushed towards the treble side just enough so that fingering one pair muffled the adjacent pair.

In one of those 'I-wish-I-had-done-it-myself' episodes, I took it to a pretty good local shop and showed them the problem. The shop's proprietor is an accomplished folkie who attends a number of get-togethers throughout FL in the spring and summer and the shop's reputation creates a pretty good backlog. So; I waited and waited and then called and called. To deal with the backlog, the shop had hired a young bench guy who was given the job of replacing the nut .... which is exactly what he did .... exactly like the old one ... he used it to dupe the new one.

After nearly 3 months, they called and said it was ready; I went down, played it a little and (perhaps I was less than a gentleman about it), pointed out that the new one had the same problems as the old one. :evil: The fact is that so much time had passed between taking it in and getting it on the bench, the proprietor - except that it was supposed to get a new nut - had lost track of why it was there in the first place. Lots of apologies and another three weeks later, they'd re-replaced and corrected the nut.

I had gotten a little put off by the cost of the nut files but ... hindsight being just about 20/20 ... had I bought the files and several blanks to practice on, I'd have had the guitar back sooner, I would have learned something, it would have cost less, and I could have kept or sold the files here. :( Anyway, congratulations on your project!
 

evenkeel

Senior Member
Silver Supporting
Joined
Sep 19, 2007
Messages
1,539
Reaction score
11
Very, very nicely done. I've been doing my own set ups for a while now. Very satisfying to do it yourself.

Love the pic of the headstock w/o the truss rod cover. 40 years of UV does have an impact. :!: :shock:
 

Taylor Martin Guild

Senior Member
Joined
Nov 4, 2007
Messages
2,737
Reaction score
271
Location
Roy, Utah
Nice job.
Have you thought about widening the spacing just a touch on one of your guitars?
I have heard of people having this done with good results, as long as it isn't overdone. Too colse to the edge of the neck and the strings can pull right off the fret board.

You should be ready to tackle some saddles now.
I didn't find them all that tough to do.
I just used an emory board and took my time.
I did a compensated B string but not a fully compensated saddle.

Next for GardMan, neck-resets!!!
 

GardMan

Enlightened Member
Joined
Jun 5, 2006
Messages
5,370
Reaction score
979
Location
Utah
Guild Total
5
Taylor Martin Guild said:
Nice job.
Have you thought about widening the spacing just a touch on one of your guitars?
I have heard of people having this done with good results, as long as it isn't overdone. Too colse to the edge of the neck and the strings can pull right off the fret board.

You should be ready to tackle some saddles now.
I didn't find them all that tough to do.
I just used an emory board and took my time.
I did a compensated B string but not a fully compensated saddle.

Next for GardMan, neck-resets!!!
TMG,
Most of my dreads have 36.5 mm spacing from E-e (center of the strings), and I find that pretty comfortable and easy to play. I had Tom widen the spacing on the D-44... he was able to get 37 mm on it, and I don't roll off too often. My D-35 is at 36 mm, and that's getting borderline too narrow.

The problem with my D-50 is the last person to dress the frets put too much bevel on the fret ends, and the nut puts the (low) E right at the edge of the bevel. Didn't realize this until I got it home... I 've been playing it a year, and it is pretty prone to rolling the E off if I am not careful (defnitely playable... but needs just a little more room). I am hoping that I can move the E over just a hair (maybe only 0.1-0.2 mm would do; maybe even the whole course of strings over 0.2 mm?)... at least until it is ready for a fret job (which might be years away).

No neck resets... but I am considering ramping a bridge or two (for better break angle) myself.
Dave
 

Marty Bradbury

Junior Member
Joined
Jan 17, 2011
Messages
41
Reaction score
0
Great job and patience!! Mabey I missed it but what material was the old nut made from?
 

GardMan

Enlightened Member
Joined
Jun 5, 2006
Messages
5,370
Reaction score
979
Location
Utah
Guild Total
5
Marty,
Based on the mold marks on the bottom, and the "thud" when it was dropped, it's plastic (bone doesn't have mold marks, and tusq makes a nice glassy "clink" when dropped). I didn't try the "hot needle" test, tho'...
Dave
 

12stringer

Senior Member
Joined
May 20, 2008
Messages
1,188
Reaction score
45
Location
Mississauga Ontario Canada
Nicely done Gardman!
I am going to invest in some nut files and take a run at replacing my plastic nut with a bone nut on my F212xl.
Thanks for posting your experience....it is inspiring me to get the lead out :wink:
 

GardMan

Enlightened Member
Joined
Jun 5, 2006
Messages
5,370
Reaction score
979
Location
Utah
Guild Total
5
12stringer said:
!I am going to invest in some nut files and take a run at replacing my plastic nut with a bone nut on my F212xl.:
Here are the sources I consulted:

https://www.stewmac.com/freeinfo/Nuts,_ ... -nuts.html
http://www.bryankimsey.com/nuts/index.htm
http://www.frets.com/FRETSPages/Luthier ... wnut1.html

I sort of followed an amalgam of the techniques in these sites. One piece of advice I seem to have missed in reading on-line instructions for making a nut was to get files that are a little LARGER than the string size. Slots should'nt be too big... but neither too small, or the strings will bind. I bought my files to match the string size almost exactly... and found/find I have to widen the slots just a smidge... particularly with the trebles (b and e). Frank Ford made a point of keeping a decent bearing surface to avoid excessive wear in the slots...mentioning 3/16". Since my Guilds only have a 3/16" nut, I kept the top profile a bit flatter than some nuts I have seen (still rounded a bit).

As for files, I started with a set of six single files from StewMac: http://www.stewmac.com/shop/Tools/Speci ... Files.html

I had trouble with the really fine ones (0.013 and 0.016) binding as I tried to file, so ended up going back and getting one of the 0.013/0.02 double edged for those slots, and felt that worked better (tho' my experience is limited to 1 nut): http://www.stewmac.com/shop/Tools/Speci ... Files.html
They're a bit sturdier, and less likey to flex when filing.

I also could have saved money by NOT buying the StewMac nut-SHAPING files. I mostly used a sanding block with different grits sandpaper (100, 320, 400, 600) for shaping and polishing. I also didn't need the StewMac microchisels for removing glue from the nut seat (maybe I'll need them next tme?)... the StewMac 3/16" nut seating file did that just fine. I DO like the StewMac nut and saddle vise... clamped it into my bench vise, and it holds securely while allowing ample room for shaping. I also got the string spacing rule... makes laying out six string with equal spacing (as opposed to equal centers) easy... but Kimsey also explains how to do that with a digital caliper (which I already had). As for the string lifter... a crochet hook would have cost a little less.

Sorry for the long post... but in retrospect, I figure I probably could have saved $50-75 if I had known a little more about the tools I would really use. I've got another one to do this weekend...fingers crossed!
 
Joined
May 8, 2008
Messages
996
Reaction score
0
Location
the five-oh-nine
That's some good work, Dave! Thanks for sharing the photos and narrative. I mostly do my own setups and have made new saddles from blanks. I have never tackled making a new nut, though. There is a sense of satisfaction when you get one dialed in just right. On the other hand, I've added some dings and scratches to instruments, that wouldn't have been there, if I knew when to say 'No'. :(

Re: The plastic nut on your D25 is probably original equipment. The D25 I had, came with a plastic nut, complete with the molding marks you've described.

Re: Agree with your observations about increasing string spacing at the nut. While possible in theory, you're really limited by the condition and shape of the frets. If the fret ends are worn or were filed down, those E strings will have to keep their distance from the edge. A re-fret is probably the best time to consider widening string spacing on most guitars.

~nw
 

bluesypicky

Enlightened Member
Joined
Sep 8, 2009
Messages
7,763
Reaction score
394
Location
Jupiter, FL.
Looks like you've done a pretty nice job Dave, thanks for sharing.
The pics are awesome too, I like the bridge pins!
What frustrates me the most when I work on set up, is the time spent loosening the strings and tuning them back up after each adjustment.... Patience is a virtue. :roll:
 

Taylor Martin Guild

Senior Member
Joined
Nov 4, 2007
Messages
2,737
Reaction score
271
Location
Roy, Utah
Nigel Wickwire said:
That's some good work, Dave! Thanks for sharing the photos and narrative. I mostly do my own setups and have made new saddles from blanks. I have never tackled making a new nut, though. There is a sense of satisfaction when you get one dialed in just right. On the other hand, I've added some dings and scratches to instruments, that wouldn't have been there, if I knew when to say 'No'. :(

Re: The plastic nut on your D25 is probably original equipment. The D25 I had, came with a plastic nut, complete with the molding marks you've described.

Re: Agree with your observations about increasing string spacing at the nut. While possible in theory, you're really limited by the condition and shape of the frets. If the fret ends are worn or were filed down, those E strings will have to keep their distance from the edge. A re-fret is probably the best time to consider widening string spacing on most guitars.

~nw

Here ya go.
http://accessories.musiciansfriend.com/ ... sku=369946
 

GardMan

Enlightened Member
Joined
Jun 5, 2006
Messages
5,370
Reaction score
979
Location
Utah
Guild Total
5
bluesypicky said:
Looks like you've done a pretty nice job Dave, thanks for sharing.
The pics are awesome too, I like the bridge pins!
The pins were made by (the late) Gordon Orth... I have six sets of custom-made Orth pins. His work was beautiful, and he was a pleasure to work with.

bluesypicky said:
What frustrates me the most when I work on set up, is the time spent loosening the strings and tuning them back up after each adjustment.... Patience is a virtue. :roll:
I hear that... I've heard of folks (Frank Ford?) just lifting the tuned-to-pitch string into the adjacent slot... I am not brave enough to do that. I tuned down a ways (not slack) to move the strings... and then made preliminary checks with it tuned part way, but not completely back to pitch. Between fitting a nut and three saddles, I think I blew out four strings (all trebles)... but after all the string de-tuning and tuning, the last step is changing the entire set, anyway.
 
Top