Questions about Novaks and Hipshots

lungimsam

Senior Member
Joined
Oct 1, 2011
Messages
2,608
Reaction score
1,658
Guild Total
2
The tape for the bridge ground wire is grounded already when it touches the bare wire end since that ground wire touches the back of a pot shell on its other end and then that goes to ground from that pot to output jack ground lug.
In theory yes all copper tape shielding needs continuity to the back of the pot all the other ground wires go to or to the ground lug of output jack somehow. Either by strips of tape that touches the back of a grounded pot shell or a wire jumper from the tape to the output jack ground lug.
However, I do have copper tape shielding covering my entire Ric bass pickguard back and control cavity, making a copper tape “box” that I never grounded or attached to a pot shell or output jack ground lug by jumper or any other means that I am aware of (unless the pot washers of the installed pots touching the copper shielding counts) and the bass is still dead quiet. So ymmv. Just be sure that you can trace with your finger a path to ground that leads eventually to the out put jack without going in a circle and coming back on itself making what is called a ground loop. So all shielding and ground wires must terminate on the same pot shell or on a point after the pot shell but on the same path to the output jack ground.

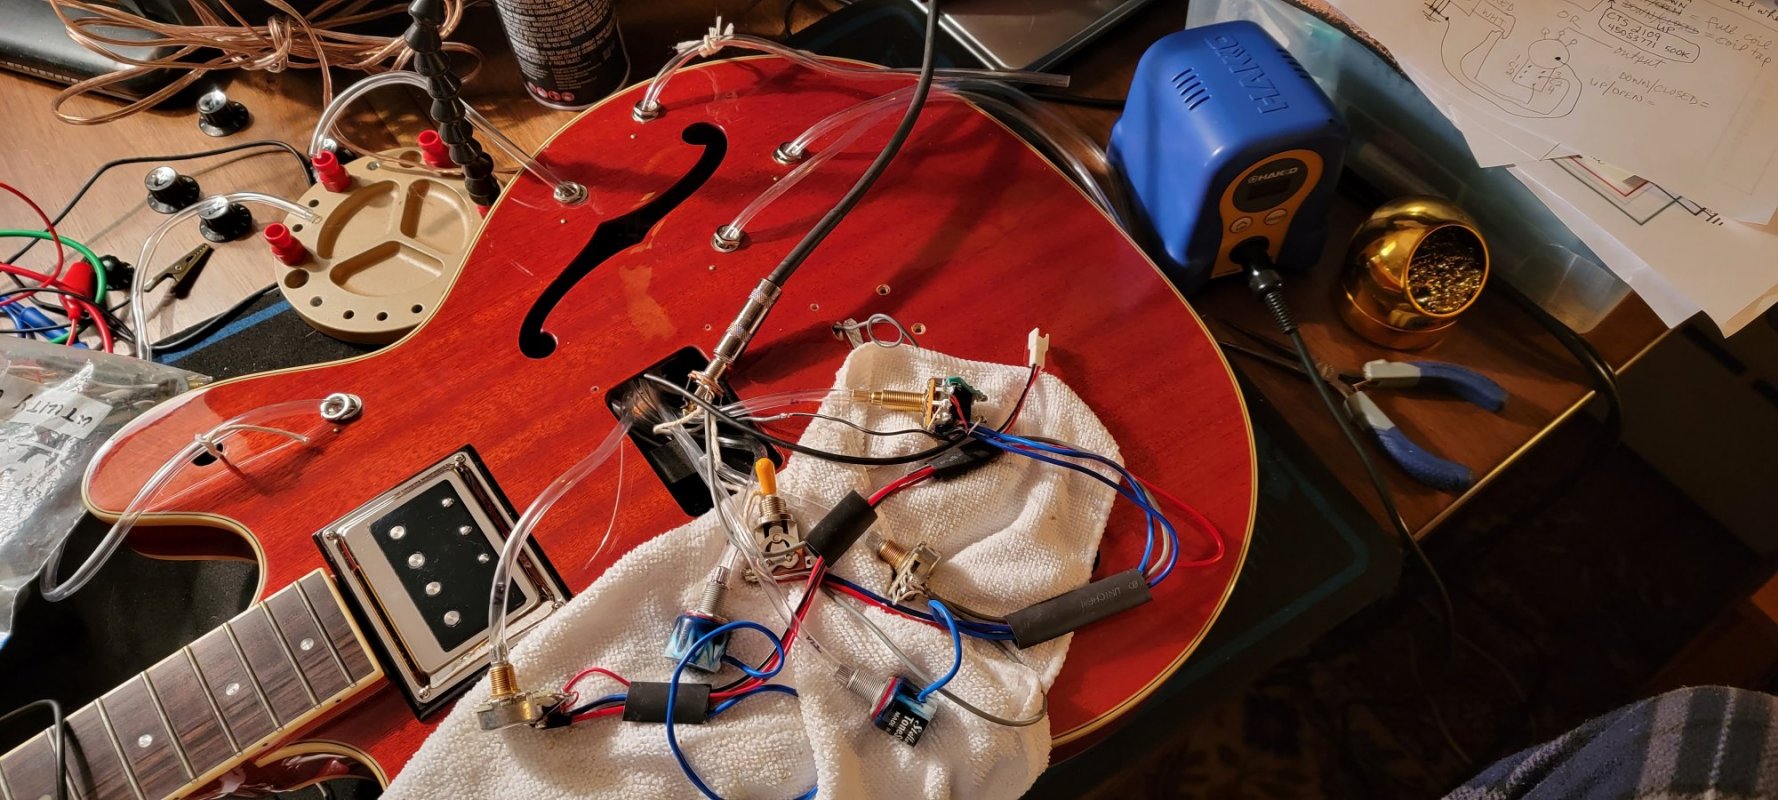
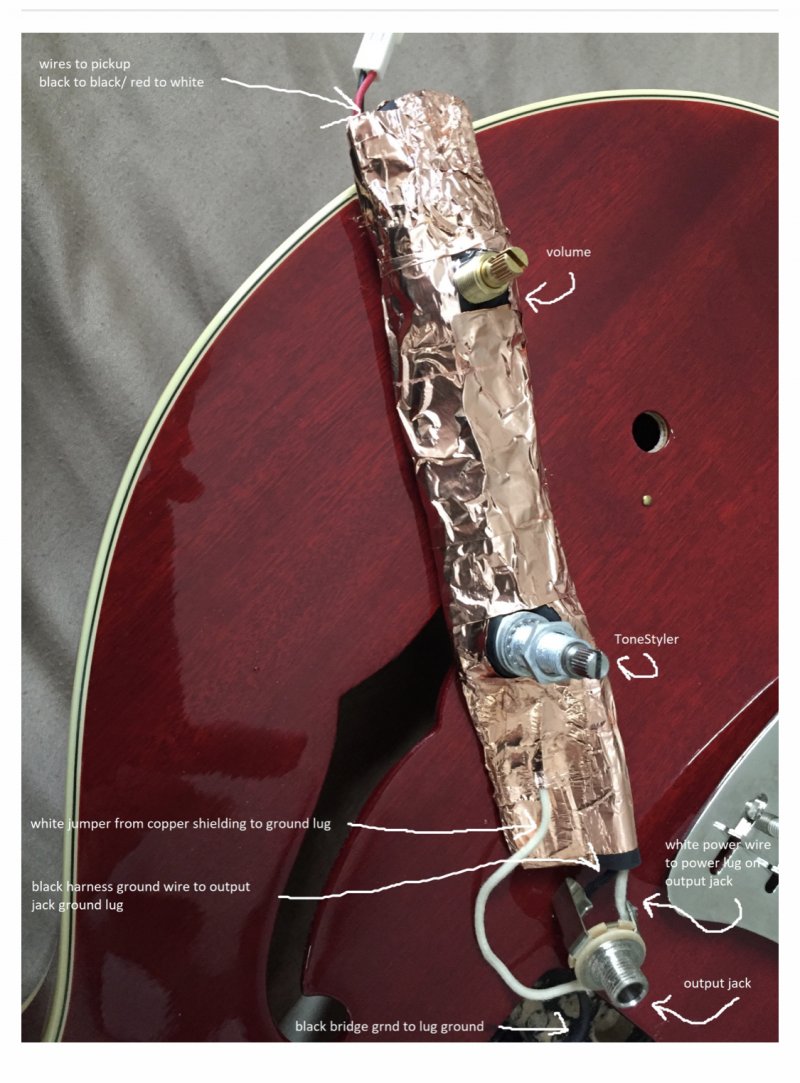
Completely shielding a harness inside a hollow or semi hollow body is a challenge. Wrapping the entire harness in butyl bicycle tire tubing and then taping over that with copper shielding tape and then jumpering the copper shielding packaging to output jack ground lug was done to great effect by myself on my Starfire I bass (as seen in my avatar pic) but I don’t know how well it could be pulled off on a Starfire II harness. My thread about shielding my NSStarfire I here: https://letstalkguild.com/ltg/index...shield-your-entire-ns-starfire-i-bass.199675/
I wish they would invent conductive shielding spray paint that could be blasted inside a semi hollow body and coat all interior walls then that could be jumpered to ground.
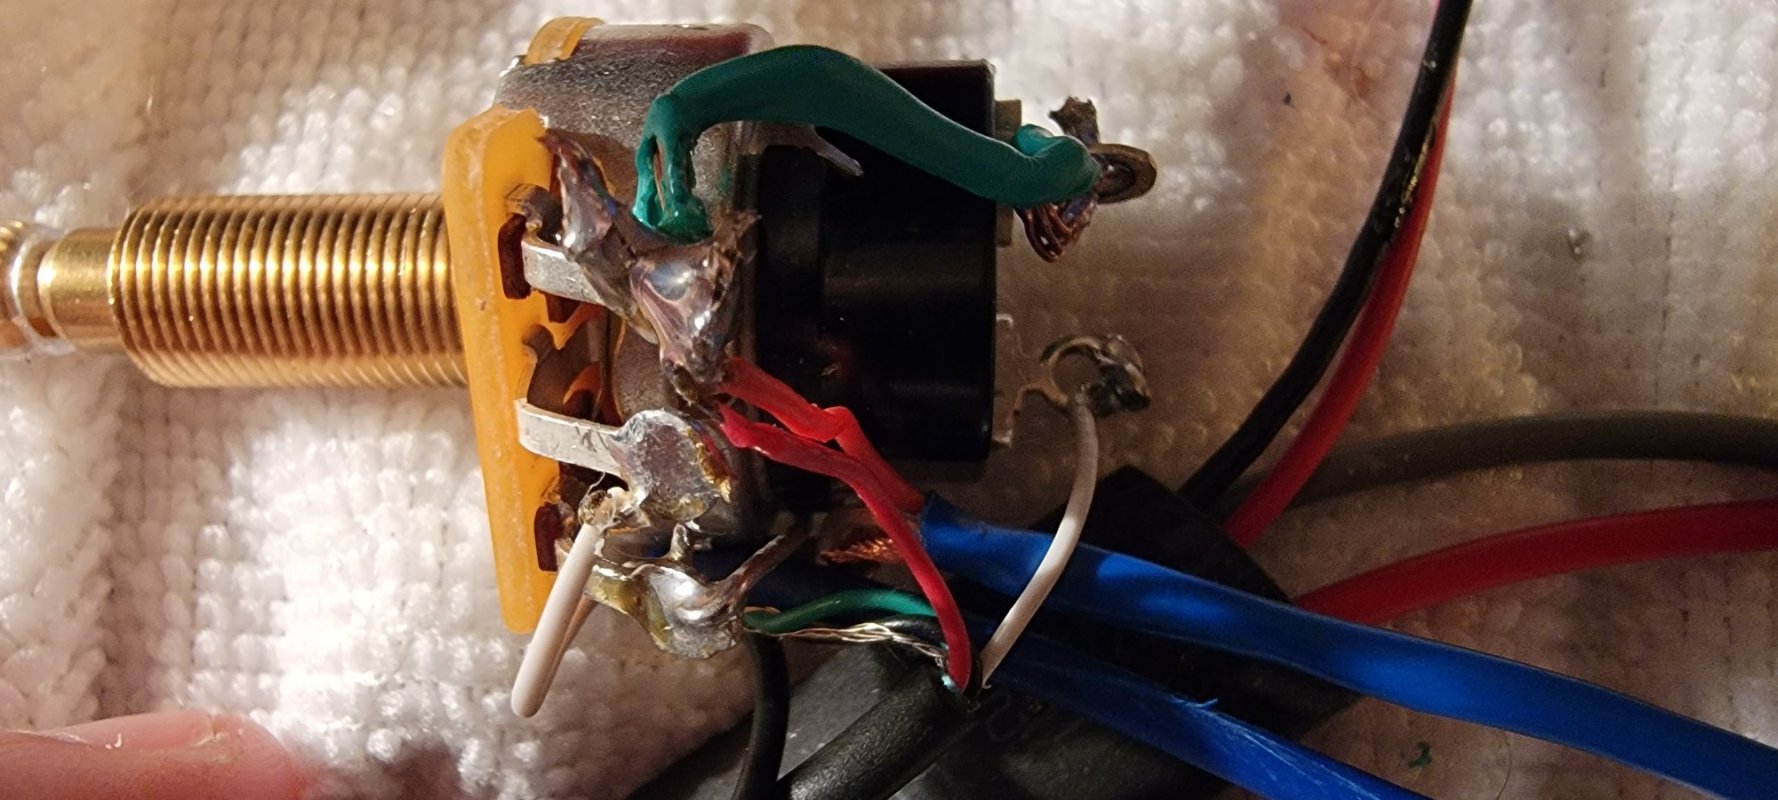
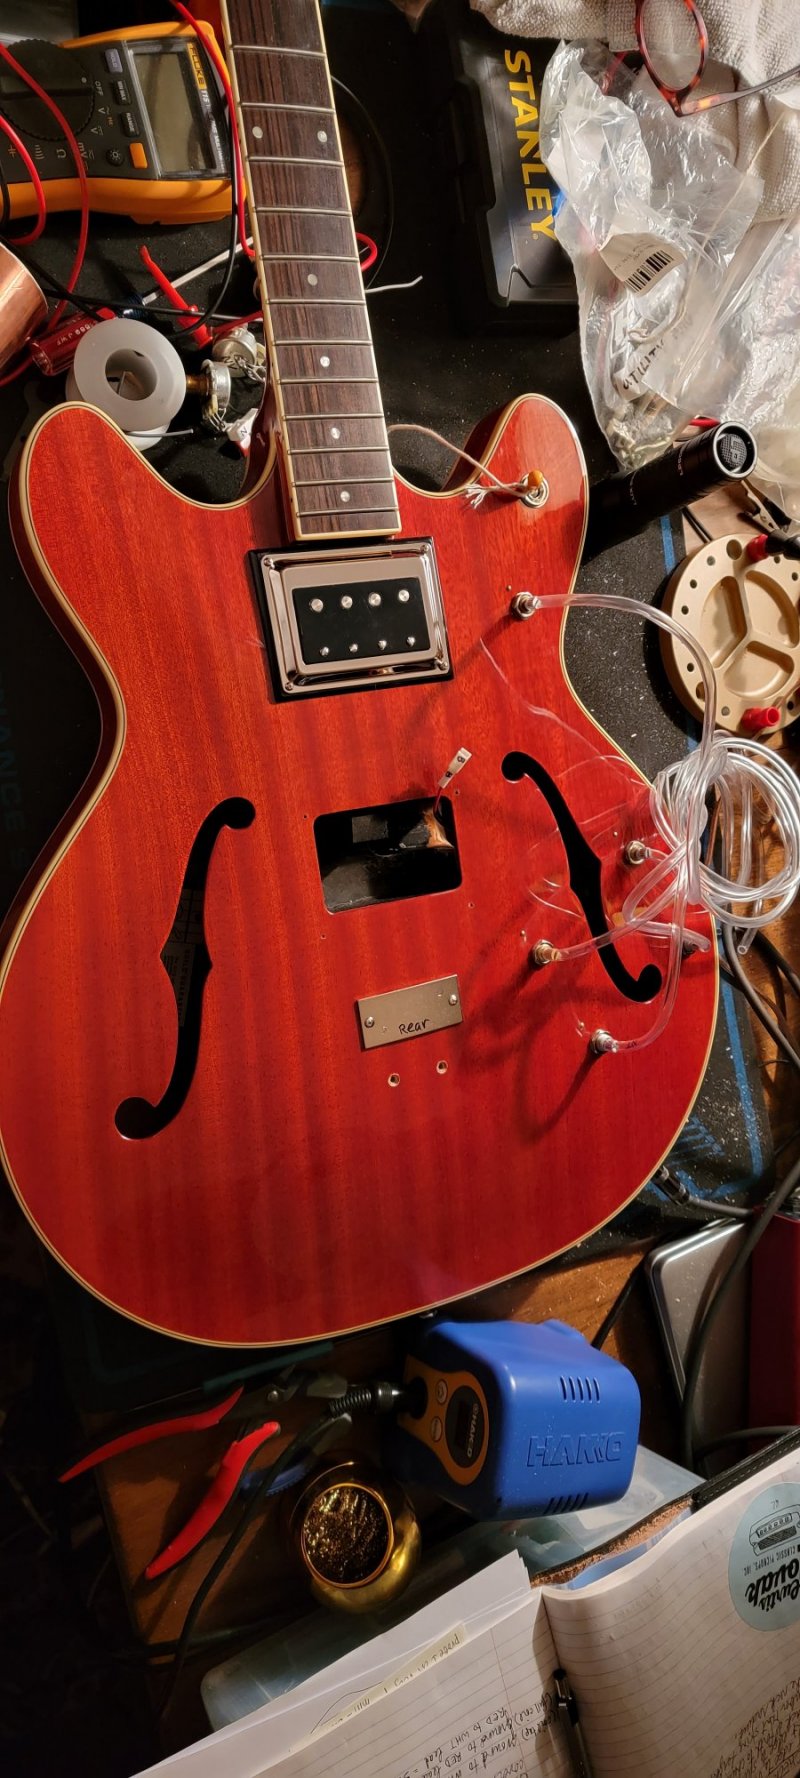
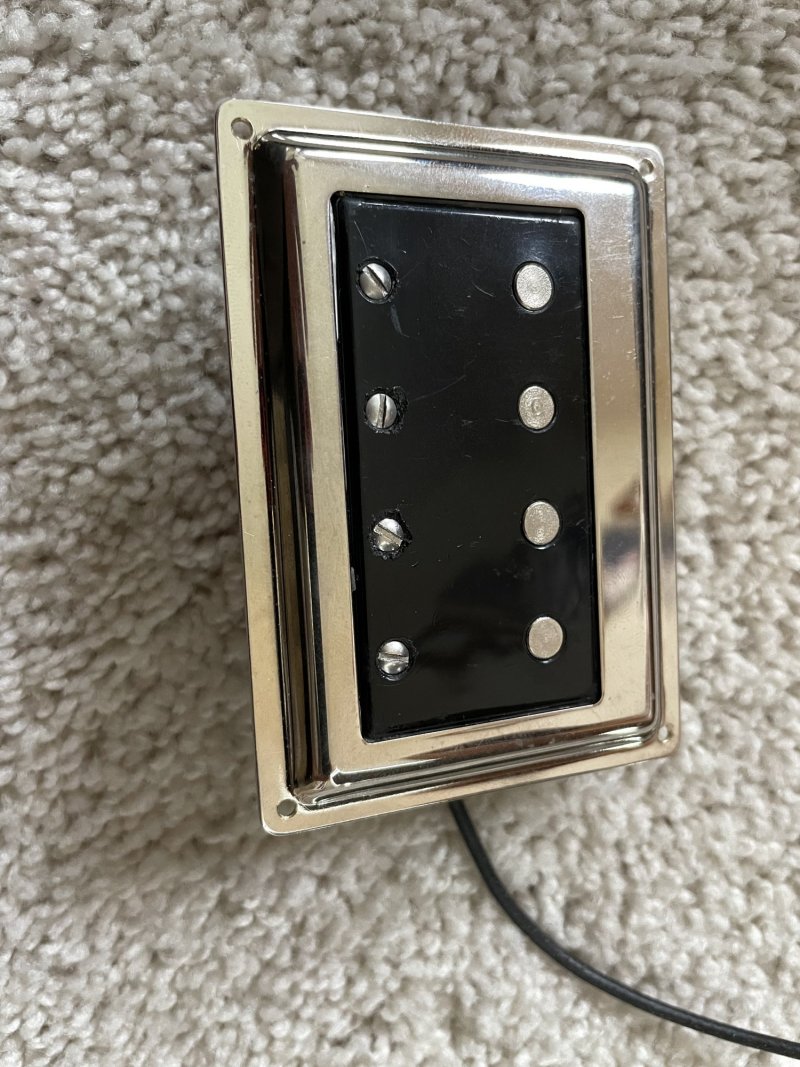
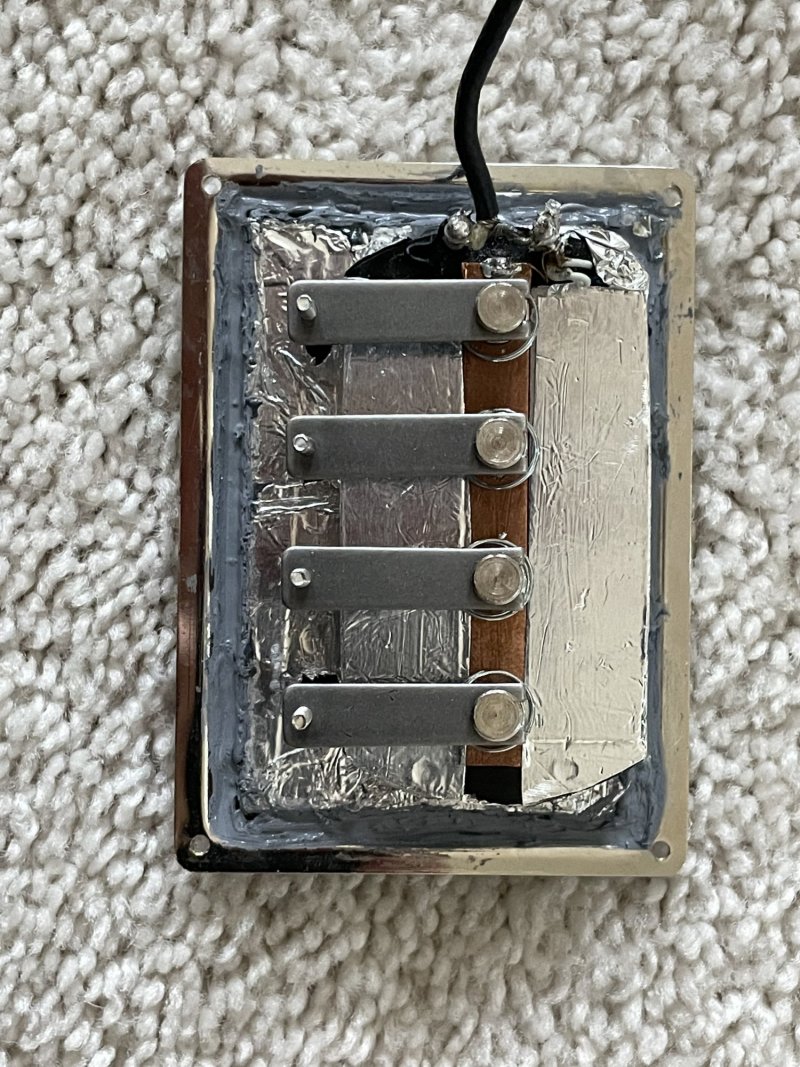
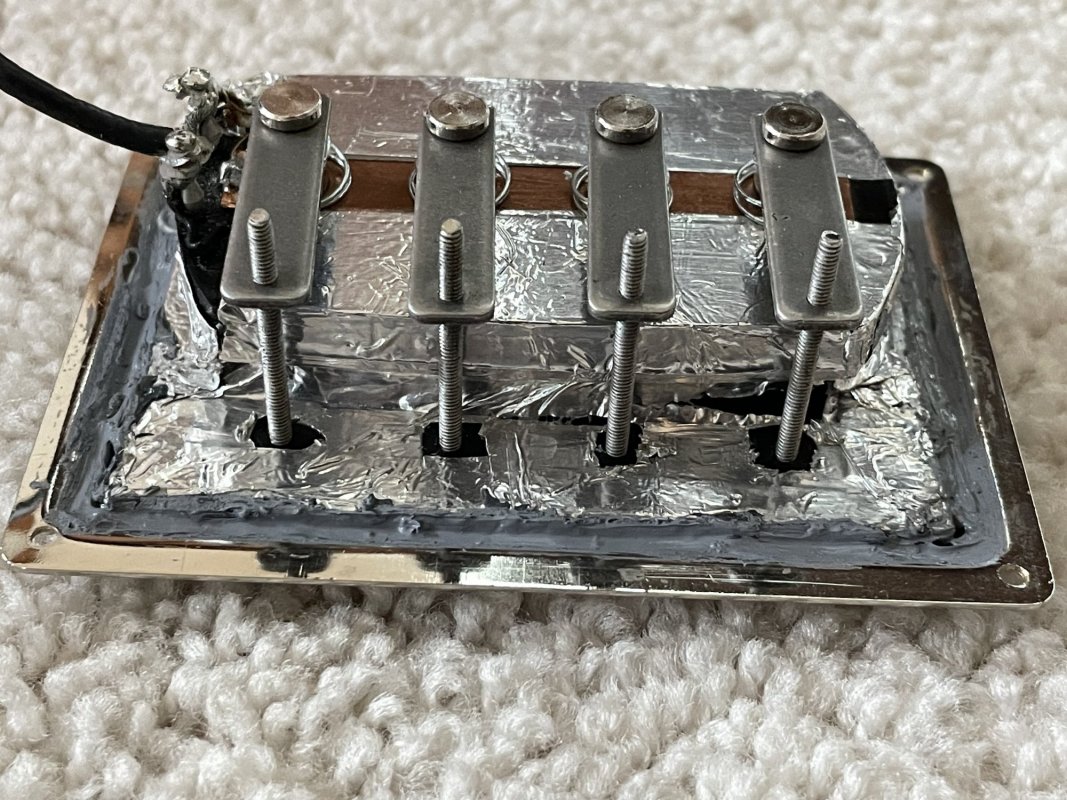
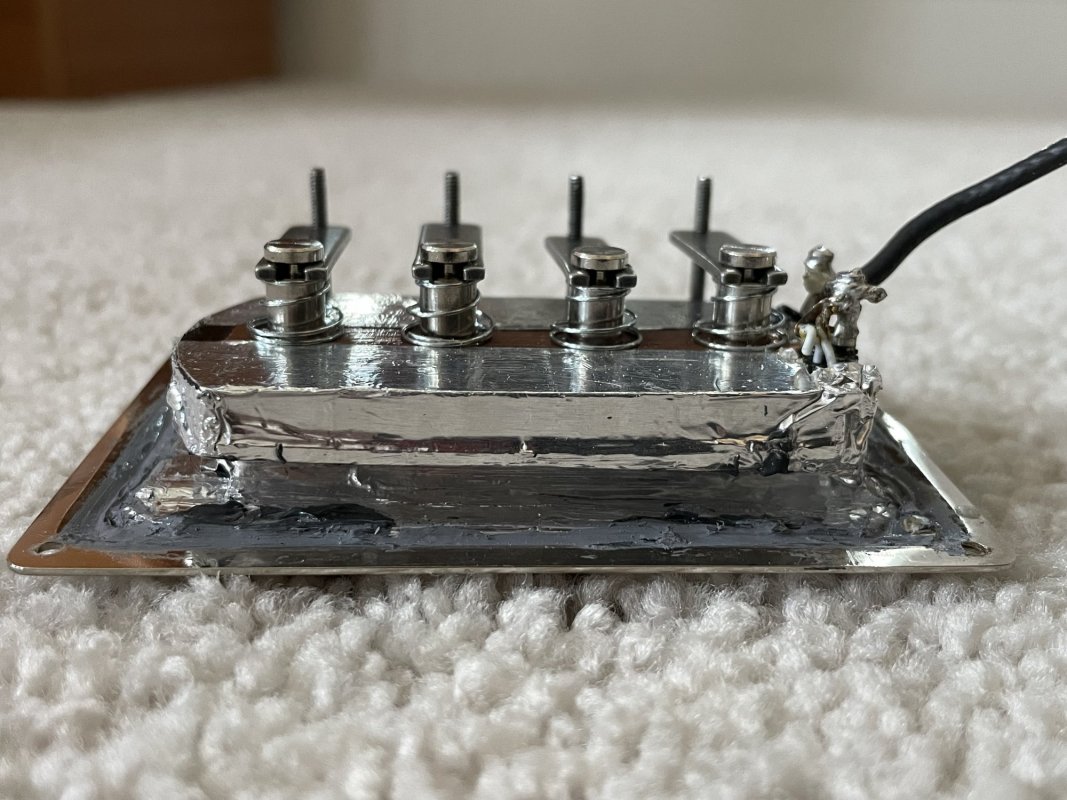
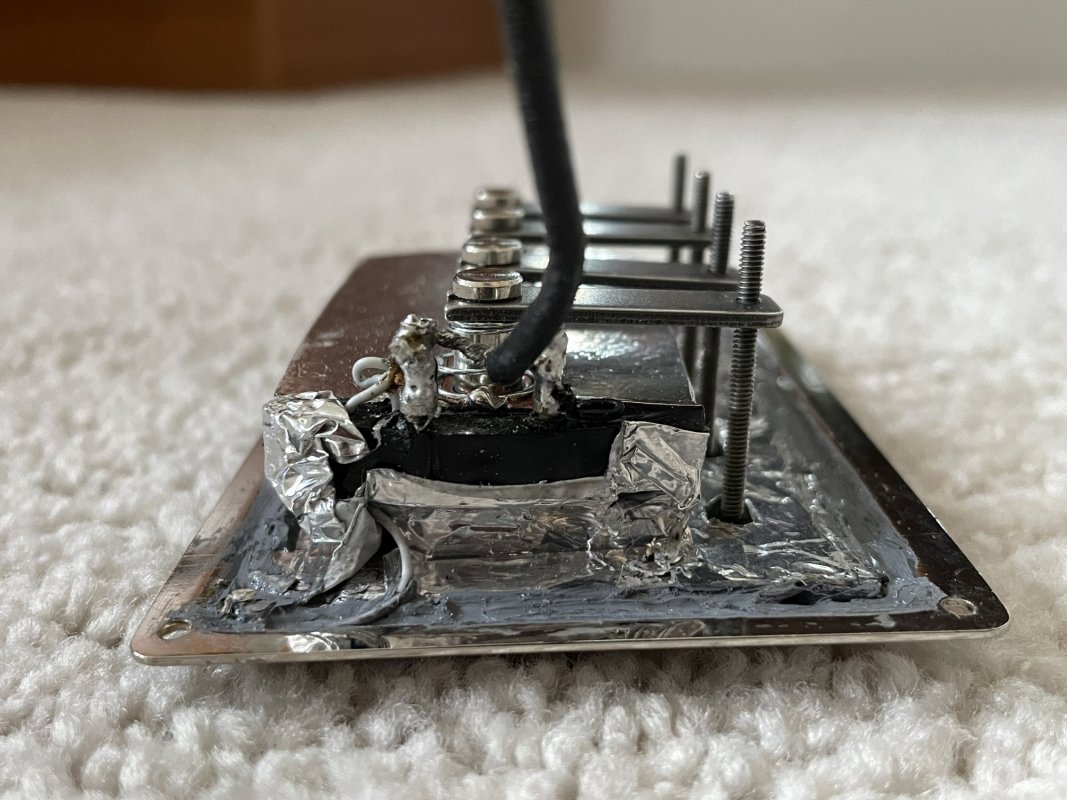
LTG member Default recently aluminum shielded taped my NS bisonic and that along with my shielded harness I did rendered the electronics dead silent in my Starfire I. Apparently, on a NS Bisonic anyway, the lamination that runs along the back of the pickup is grounded, so as long as you tape across that, all the tape will be grounded because the adhesive conducts too. Here are some pics of the shielded, two magnet magnet NS bisonic, as well as my coppershielded NSStarefireI harness before sliding that shielded package into the body thru the bridge pup cavity hole. Here's a pic of the Silversonic:
 

Attachments

  • DD62A675-FE5E-4CE8-9952-C2C830776815.jpeg
    DD62A675-FE5E-4CE8-9952-C2C830776815.jpeg
    519.9 KB · Views: 111
  • 507D416E-3F63-4ECD-A7BA-D25E87F5C258.jpeg
    507D416E-3F63-4ECD-A7BA-D25E87F5C258.jpeg
    618 KB · Views: 119
  • 6500535C-38C9-4CC8-8E76-EED5D06800B0.jpeg
    6500535C-38C9-4CC8-8E76-EED5D06800B0.jpeg
    607.4 KB · Views: 117
  • 45C71343-CD6A-4452-B386-7B8E4567A5FF.jpeg
    45C71343-CD6A-4452-B386-7B8E4567A5FF.jpeg
    485 KB · Views: 119
  • F9D61719-C696-42D8-B503-BF4142FEC5E8.jpeg
    F9D61719-C696-42D8-B503-BF4142FEC5E8.jpeg
    508.3 KB · Views: 117
  • EF976AD2-B230-4DE7-8039-E10E76ECB32F.jpeg
    EF976AD2-B230-4DE7-8039-E10E76ECB32F.jpeg
    466.5 KB · Views: 125
  • B31D2CF2-F118-493F-BADF-18DF99DB3F73.jpeg
    B31D2CF2-F118-493F-BADF-18DF99DB3F73.jpeg
    1.5 MB · Views: 107
Last edited:

lungimsam

Senior Member
Joined
Oct 1, 2011
Messages
2,608
Reaction score
1,658
Guild Total
2
PS the butyl bike tube wrap is used to keep the copper shielding tape from touching any of the electronics. You can see the bike tube peeking out from one end of the copper shielding “sausage” wrap down by the output jack end and also around the pot shaft bases. I added a link in the post above about doing this on my bass.
 

Attachments

  • 3A0B166F-D09C-47D2-8FD7-22C187439ACD.jpeg
    3A0B166F-D09C-47D2-8FD7-22C187439ACD.jpeg
    1.5 MB · Views: 107

Default

Super Moderator
Platinum Supporting
Joined
Jul 30, 2007
Messages
13,640
Reaction score
3,066
Location
Philly, or thereabouts
Guild Total
11
The Newark Street/Gretsch/whatever other brands wiring harness is built to be cheap, not built to be good. I suggest that the next time you all do a build, get some foil-shielded single conductor wire. Looks like you guys are comfortable with an iron, so it would kill a lot of spurious noise and be another 2-3 minutes of effort. The stock wiring harness is made so assembly is quicker, not so the bass is quieter, and you will be much happier with your instrument if you use shielded wire.
My $.02
 

thornev

Junior Member
Joined
Oct 15, 2021
Messages
79
Reaction score
33
Location
Hudson Valley NY
Guild Total
1
It seems to me that most of the wiring in my bass is shielded. I'm talking about the braid inside a lead that wraps around the signal wire. Yes, there are a few places where that is not used. But it seems to me that if appropriate attention is paid to grounding considerations, 99% of noise can be eliminated. Or am I pie in the sky'ing?
 

Default

Super Moderator
Platinum Supporting
Joined
Jul 30, 2007
Messages
13,640
Reaction score
3,066
Location
Philly, or thereabouts
Guild Total
11
It's six bucks for a six foot length on Amazon. For the next build. I can't think of a vintage build that doesn't use shielding as much as possible, and, even then, there can be mistakes. I finally looked at a buddy's Jazz bass, and the ground connection was never attached.
 

lungimsam

Senior Member
Joined
Oct 1, 2011
Messages
2,608
Reaction score
1,658
Guild Total
2
I see braided for 6$ but not foil shielded.
Which brand/vendor do you use, Default? Thanks for the tip.
Could not find single conductor foil on Amazon. Just 2+
Doesn’t the foil of each wire have to somehow be grounded to a pot?
Or does it not get grounded and it just absorbs/deflects noise?

I have some of this wiring (specs below) on hand. I guess unshielded is ok for ground wires and this shielded wire is good for hot wires to jack, provided the braid is soldered to a ground point to pickup the ground current along the way:
Single conductor
26 AWG
Copper covered steel conductor
Braided tinned copper shield
PVC outer insulation
0.100" (2.54mm) outer diameter

My Bisonic you shielded has shielded wiring from pup. But the new Bisonic that is coming does not. Maybe I will use a run of this to replace the stock leads. Just solder the braid to the Bisonic ground post and the inner wire to the hot post of the pup.
 
Last edited:

Default

Super Moderator
Platinum Supporting
Joined
Jul 30, 2007
Messages
13,640
Reaction score
3,066
Location
Philly, or thereabouts
Guild Total
11
I ask, please, don't try to solder to the pickup posts!
The plastic on the pick melts very easily. I did that on your pickup, but I was on it for only a few seconds and seeing how quickly the plastic softened, I won't do that again!
What I would suggest is trim the stock wires and solder to them. I'd tape the shielded wire to the magnet opposite the pole piece adjusters with your copper tape, as a strain relief. I'll scratch around and see where I got mine.

You don't need unshielded, for the most part, unless you want a short jumper for too many ground wires. You can generally solder the braid to the back of the pot. The foil has a ground wire that runs in contact with it, so you don't have to worry about soldering that. I did that on your pickup, but I think that is unnecessary and I don't know why I did that. I suspect too much coffee.
 

thornev

Junior Member
Joined
Oct 15, 2021
Messages
79
Reaction score
33
Location
Hudson Valley NY
Guild Total
1
These are the minimum rules I follow when I consider grounding:
1. Ground each pot only once.
2. There must be only one path from a device to be grounded to the main ground point.
3. Ground everything to one central ground point.
4. Any shielding must be connected to ground.
5. Star grounding is the preferred grounding method in small compartments.
6. Test grounding is correct by using a multimeter on continuity setting. Probe #1 goes to the main ground point (on guitars that is the ring on the 1/4" output jack). Probe #2 must touch all metal devices to ensure there is continuity. Probe #2 must also touch all other exposed wiring (i.e. signal wiring) to ensure there is no continuity.
7. Strings must be grounded too and is usually accomplished by running a ground wire to the bridge or tailpiece.
8. conductive paint must also be checked for proper grounding.
 
Last edited:

lungimsam

Senior Member
Joined
Oct 1, 2011
Messages
2,608
Reaction score
1,658
Guild Total
2
Sounds like you are getting close to having it all done now.
I am sure it will sound amazing!

I'll add #9:
Final continuity test after it is all installed is one probe on a string and the other probe on the output jack sleeve.
 
Last edited:

thornev

Junior Member
Joined
Oct 15, 2021
Messages
79
Reaction score
33
Location
Hudson Valley NY
Guild Total
1
Actually the final test is playing the bass and ensuring there ain't no hum or buzz ! :) I'm about ready to add some copper shielding and then stuff the harness back in. I'm a little apprehensive about breaking a solder joint when stuffing the harness. Also I believe there needs to be an order to stuffing the components so they fan out to their respective locations and there is no undue pull on any joints. That's a tough one.

The ground wire from the neck volume pot to the bridge was especially tight already so I'm a little worried about putting that wire back. I had to add about 8 inches of extension wire in order to pull that wire out of the bass with the rest of the harness so I can pull it back into the bass.

All of this is my first time working a guitar without a rear access door and only F holes. I'm making it up as I go, trying to get tips from all you more experienced folks.
 
Last edited:

lungimsam

Senior Member
Joined
Oct 1, 2011
Messages
2,608
Reaction score
1,658
Guild Total
2
Sounds like you are doing great.
I am flying by the seat of my pants on my SFI to II conversion, too.
I guess worst case we would have to pull everything back out and make the hole in the center block bigger so the stuff can pass through easier. Hopefully it all goes in easy, though.

What are you applying the copper shielding too?
 

thornev

Junior Member
Joined
Oct 15, 2021
Messages
79
Reaction score
33
Location
Hudson Valley NY
Guild Total
1
Copper shielding is replacing the aluminum (?) strip under the bridge plate. I just looked at all the wiring and it's all pretty much wrapped in braided shielding. So I don't know that I really need any copper shielding anywhere else. I'm concerned that adding copper wrapping might make it even harder to get the harness back inside the guitar. And like I said, when I tested after everything was soldered, I don't get any hum nor buzz. I think I'm OK as is.
 

lungimsam

Senior Member
Joined
Oct 1, 2011
Messages
2,608
Reaction score
1,658
Guild Total
2
Are you using linear taper volume pots or audio taper volume pots?
 

thornev

Junior Member
Joined
Oct 15, 2021
Messages
79
Reaction score
33
Location
Hudson Valley NY
Guild Total
1
Lesson learned - make sure you remove the cap on the 3-way selector before trying to get it back inside the guitar. If you don't, good luck getting it back through its hole with the washer and nut attached.
 
Last edited:

thornev

Junior Member
Joined
Oct 15, 2021
Messages
79
Reaction score
33
Location
Hudson Valley NY
Guild Total
1
re linear or audio taper pot... Good question because I know the difference but didn't specify the linear parameter which is my preference. I'll find out.
 

thornev

Junior Member
Joined
Oct 15, 2021
Messages
79
Reaction score
33
Location
Hudson Valley NY
Guild Total
1
TA DA !! Harness is back in the bass !!! This has got to be one of the worst soldering jobs ever. But considering I had to solder, unsolder, resolder, unsolder again and resolder again, I guess I can cut myself some slack. And it's hidden inside. And hey... IT WORKS !!! I'll tighten everything up and start a jam session with myself. I had to use a Dremel to open up the pickup hole more because the new push-pull pot wouldn't fit through. I'll report back on what I think of the Novak BS-DS.
 

Attachments

  • 20211024_215853.jpg
    20211024_215853.jpg
    276.7 KB · Views: 125
  • 20211024_215911.jpg
    20211024_215911.jpg
    378.2 KB · Views: 127
  • 20211025_211043.jpg
    20211025_211043.jpg
    352.1 KB · Views: 117
Last edited:

thornev

Junior Member
Joined
Oct 15, 2021
Messages
79
Reaction score
33
Location
Hudson Valley NY
Guild Total
1
Something very wrong. When I put the bridge back on, the strings are WAY off settling over the pickup screws. I tried messing with the rear screws, but what are the specs for setting up a Starfire II bridge? I know about the saddle height adjustments, but those rear screw heights seem to be crucial to be setup correctly. I would imagine there is a height spec.

UPDATE: I think I figured it out. I had to loosen the strings but just enough so that there is some tension. That way I can screw in the rear bridge screws so that the strings sit over the pickup screws. Then tune to pitch making sure the strings stay on top of the pickup screws. Worked for me. But is there a more technical method?
 
Last edited:
Top