You are using an out of date browser. It may not display this or other websites correctly.
You should upgrade or use an alternative browser.
You should upgrade or use an alternative browser.
Latest in progress from AHG
- Thread starter AcornHouse
- Start date
AcornHouse
Venerated Member
The curve flattens out a bit there, but no dent that I can see.is it just an illusion in the picture? But I see a slight "dent" in the curve of the side at 3rd side support on treble side: At least i think I see it.
GGJaguar
Reverential Member
It won't be long now!All kerfed up.
JohnW63
Enlightened Member
Don't slip with a sharp object now. You're tool close to the finish line!
AcornHouse
Venerated Member
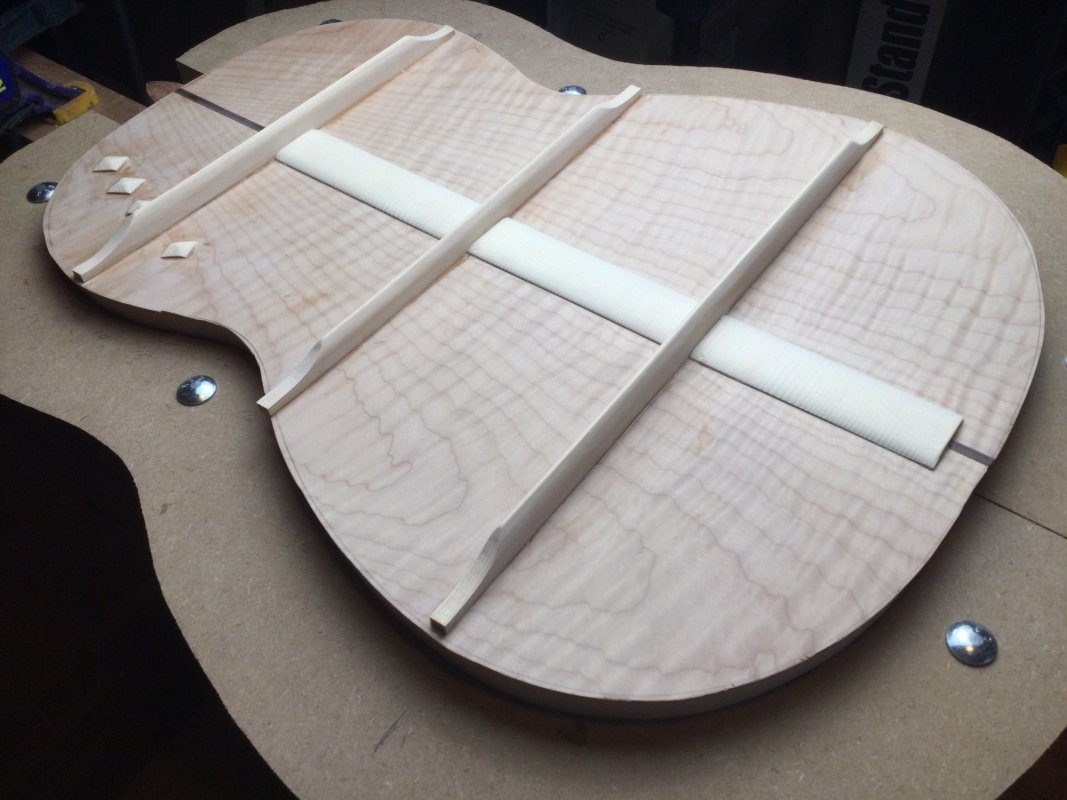
The back is braced. Braces are arc’d to a gentle 40’ radius, shaped and ramped. Ready to be fit into the sides.
Now, you might notice a few diamonds. Those are not bling (well, not JUST bling). @JohnW63, you mentioned slips: well, slips do happen. If you’re a big factory, you would just throw the part into the bin. Small builders can’t do that (plus, it’d be a shame to get rid of a back like this.) When I glued on the upper brace, the cam clamps pulled it out of vertical. (Never do a glue up late at night!) I should have clamped the end clamps first to keep it straight. (The clamped brace shown a few posts ago was the redo.) So, the next day, I went to get the brace off to redo it. It was going well. Too well. I used a little too much upward force, the glue held too well, and it snapped part of the upper bout. Not completely off, but a definite break. After some mild (ok, not so mild) language, I set about gluing it closed. It was clean, and it glued back beautifully. It’s basically invisible and solid as if it were, well, solid. But I wanted to add a little insurance and cleated what I was pretty sure was the break (it was so invisible I had a hard time seeing it.) The recipient knows about it and is fine with it.
Tage Frid, The Godfather of modern American woodworking always said that mistakes happen; wood‘s gonna wood. The skill is knowing how to fix it.

Last edited:
Nuuska
Enlightened Member
You might also think of it the way american indians thought - only The Allmighty makes no mistakes and is perfect - in order to respect that they left small imperfections on their fine works. So not to offend The Spirit.
- Joined
- Feb 11, 2009
- Messages
- 22,919
- Reaction score
- 18,520
- Location
- NJ (The nice part)
- Guild Total
- 112
Why does the bottom get individual pieces but the top gets strips? Is it because you’re gluing the top blind and it would be difficult to make individual pieces perfectly straight?
AcornHouse
Venerated Member
When gluing the sides to the soundboard, individual pieces let you separate the operations. First, glue in the sides to the neck slots. Then glue the tailblock on. Then the individual tentellones can get glued. You’re not trying to do everything at once. Very low stress. (Although there are some you do use strips for the soundboard, gluing them to the loose sides first. Not for me, my way is traditional and so much easier.) No need to try to juggle three different glue areas and make sure they go together correctly, all before the glue starts to set up.Why does the bottom get individual pieces but the top gets strips? Is it because you’re gluing the top blind and it would be difficult to make individual pieces perfectly straight?
When gluing the back on, there’s only one step. So it’s easier to use the kerfing strips (or laminated linings) and glue them to the sides first. Then, because the back has an arc as well as tapering down to the neck, the kerfing is sanded to that radius and taper in place, ensuring a precise fit. (The depth changes from 95mm at the tailblock, down to 85mm at the neck “joint”; tapering at the waist.) There’s no benefit from using the tentellones here. It’s easy to clamp the strips to the sides. Then the back braces are notched into the kerfing, everything is test fit, adjustments made, and the back gets glued and clamped.
- Joined
- Feb 11, 2009
- Messages
- 22,919
- Reaction score
- 18,520
- Location
- NJ (The nice part)
- Guild Total
- 112
When gluing the sides to the soundboard, individual pieces let you separate the operations. First, glue in the sides to the neck slots. Then glue the tailblock on. Then the individual tentellones can get glued. You’re not trying to do everything at once. Very low stress. (Although there are some you do use strips for the soundboard, gluing them to the loose sides first. Not for me, my way is traditional and so much easier.) No need to try to juggle three different glue areas and make sure they go together correctly, all before the glue starts to set up.
When gluing the back on, there’s only one step. So it’s easier to use the kerfing strips (or laminated linings) and glue them to the sides first. Then, because the back has an arc as well as tapering down to the neck, the kerfing is sanded to that radius and taper in place, ensuring a precise fit. (The depth changes from 95mm at the tailblock, down to 85mm at the neck “joint”; tapering at the waist.) There’s no benefit from using the tentellones here. It’s easy to clamp the strips to the sides. Then the back braces are notched into the kerfing, everything is test fit, adjustments made, and the back gets glued and clamped.
Neat! Thanks for not pointing out that I got the top and back reversed.
I wonder - are semi-hollow and hollow-body electrics made similarly? That could explain why I've had parts (double-stack stereo master volume) that I couldn't remove from a Starfire since they would have been installed before the back was glued on.
AcornHouse
Venerated Member
No, archtops are constructed similar to steel string acoustics, with the neck going on after that the body is together. And since the bracing on the top typically doesn’t extend to the sides, there’s no notching. So, kerfing strips are used both top and bottom.Neat! Thanks for not pointing out that I got the top and back reversed.
I wonder - are semi-hollow and hollow-body electrics made similarly? That could explain why I've had parts (double-stack stereo master volume) that I couldn't remove from a Starfire since they would have been installed before the back was glued on.
I doubt any electronics were put in before the box was closed up. They are usually fed through the pickup openings or the f-hole.
AcornHouse
Venerated Member
JohnW63
Enlightened Member
Sorry to jinx you Chris! Unless you already had you accident before I typed anything.
LeFinPepere
Member
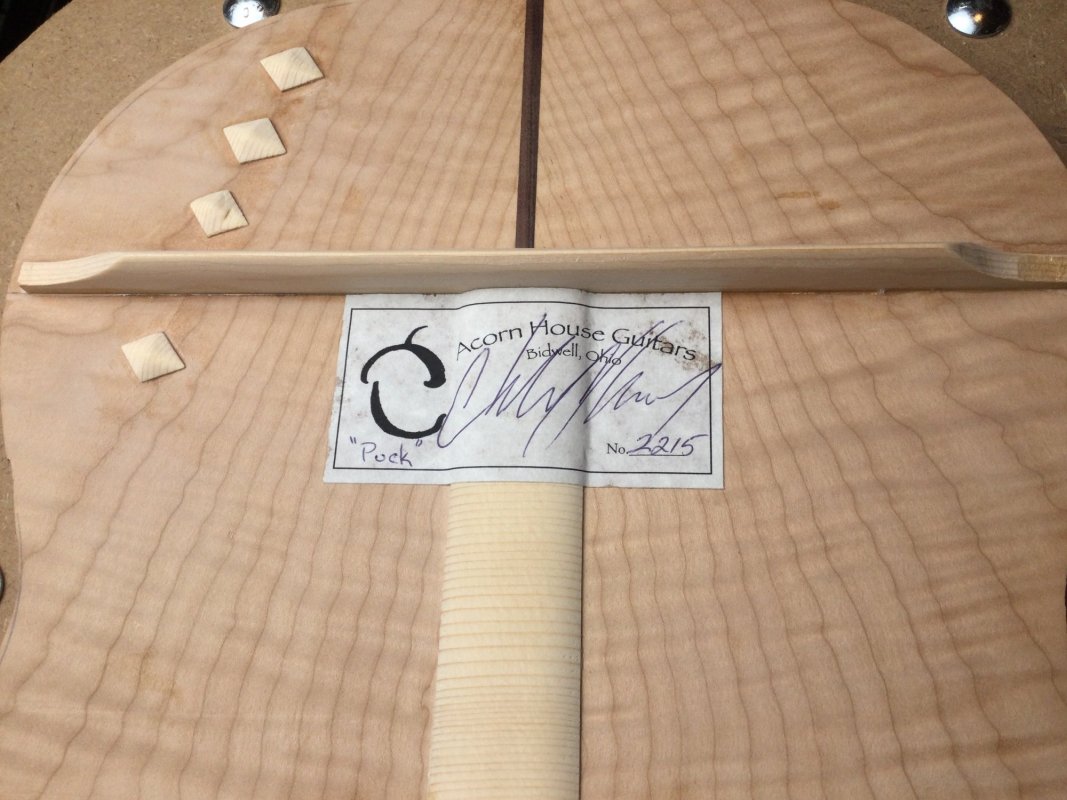
Does that mean Puck is your 2215th instrument?Wow!!! I can hardly drive in a nail properly,so I admire your work.
The Acornhouseworkshop is sure worth the visit! (Love the butternut electric! Reminds me the Standell/Acoustic Black Widow guitar..)
The Acornhouseworkshop is sure worth the visit! (Love the butternut electric! Reminds me the Standell/Acoustic Black Widow guitar..)
AcornHouse
Venerated Member
You got it!Maybe :
- 22 = year 2022
- 15 = instrument # 15 since dawn
GGJaguar
Reverential Member
Did you leave any mysterious pencil marks on the interior of the body so as to perplex future researchers?Better get that label glued in before I close the back.
AcornHouse
Venerated Member
There is a sketch for a perpetual motion engine that runs on dust sketched under the top. But I don’t suppose anyone’s interested enough to go to the trouble of reading it.Did you leave any mysterious pencil marks on the interior of the body so as to perplex future researchers?
chazmo
Super Moderator
I heard you'd done a proof of Fermat's last theorem sketched underneath the kerfing...There is a sketch for a perpetual motion engine that runs on dust sketched under the top. But I don’t suppose anyone’s interested enough to go to the trouble of reading it.
