1967 F-312 de-construction question (glue)

zzwerzy

Junior Member
Joined
Oct 23, 2022
Messages
10
Reaction score
14
Guild Total
3
This instrument needs its bridge-plate removed. Heating & prying hasn't worked. My luthier wonders what kind of glue was used. Does anyone here know about that? Or better yet, might someone share their experience performing this operation on a Guild steel string acoustic of similar age?

Thank you!
z
 

zzwerzy

Junior Member
Joined
Oct 23, 2022
Messages
10
Reaction score
14
Guild Total
3
Thanks, chazmo.

We wish to remove the bridge-plate from the top.
 

Christopher Cozad

Senior Member
Platinum Supporting
Gold Supporting
Joined
May 11, 2010
Messages
2,449
Reaction score
1,589
Location
near Charlotte, NC
Hi zzwerzy,

For repairs such as this, it is common for luthiers to compare Guilds to Martins, as both brands' instruments were primarily constructed with animal protein glue. I have jokingly stated that some Martins I have encountered are seemingly built with such a minimal amount of glue, it is as though you could simply breathe a warm sigh across a given wooden component and the glue would release. I have never experienced this with a Guild guitar. By contrast, many Guilds have been built using copious amounts of glue, complicating any repair efforts, and doing nothing to mitigate the industry-wide reputation that “Guilds are harder to work on.”

For the record: All hide glue is not created equal. I can only speculate, as I do *not* have definitive proof (I wasn’t there), but my guitar assembly and disassembly experience leads me to reason that many (most?) of the Guild guitars I have ever encountered used a hide glue having a higher bond strength than did many (most?) competing brands of the same era. This simple fact alone can explain why many Guild repair experiences are seemingly more difficult.

Luthiers familiar with Martin guitar repairs are often expecting that a minimal application of heat applied directly to the bridgeplate is sufficient for its removal with zero or minimal tearout (yes, it is really does occur and yes, it is a beautiful thing to behold). I have never experienced this to be the case with a Guild guitar. Additional heat must be applied over additional time (and potentially, with judicious use of moisture). And yes, that means there is additional concern for the loosening of the bonds of every part in proximity: bridge to soundboard, soundboard plate to plate, the X brace and even the closest tonebar. It is a reality and if you prepare for it, you can deal with it.

That is not to say that all Guild guitars are somehow “nightmares” to repair. That is not the case. But they do tend to require a different approach.
 
Last edited:

zzwerzy

Junior Member
Joined
Oct 23, 2022
Messages
10
Reaction score
14
Guild Total
3
Dear Christopher,

What a helpful and informative message. Can't thank you enough for sharing your perspective and experience. Really.

A Gold Star for you, my friend!
z
 

zzwerzy

Junior Member
Joined
Oct 23, 2022
Messages
10
Reaction score
14
Guild Total
3
GuildFriends,

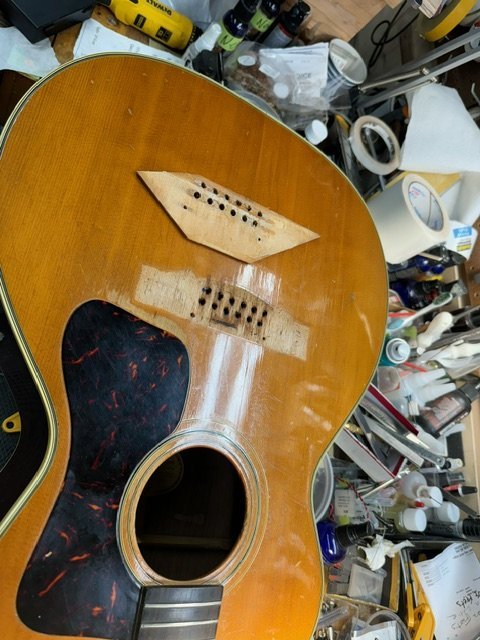
Your advice was very helpful and confidence building. Here is the part in question, removed cleanly with no damage to the fifty-seven year old top! Phew! Whatta relief!

bridgeplate.jpg

Thanks again,
zzwerzy
 

12 string

Senior Member
Joined
Aug 25, 2007
Messages
1,524
Reaction score
430
Location
CA
Guild Total
5
Mr z, I know I'm not the only one around here wanting to see some pix of the rosewood! Good luck with your project and happy 12ing.

' Strang
 

chazmo

Super Moderator
Gold Supporting
Joined
Nov 7, 2007
Messages
26,165
Reaction score
7,560
Location
Central Massachusetts
GuildFriends,

Your advice was very helpful and confidence building. Here is the part in question, removed cleanly with no damage to the fifty-seven year old top! Phew! Whatta relief!

bridgeplate.jpg

Thanks again,
zzwerzy
Neat!!!! Very nice job! How does the underside of the top look without the plate in place? Are the two small holes on either side of the pins ones you drilled for steam?
 

zzwerzy

Junior Member
Joined
Oct 23, 2022
Messages
10
Reaction score
14
Guild Total
3
Posted those questions to my luthier. Stand by ...

Also:
Mr z, I know I'm not the only one around here wanting to see some pix of the rosewood! Good luck with your project and happy 12ing.

' Strang
Hi, 'Strang.

Just to allay the anticipation a bit, the F-312 RW sides and back are straight-grained. The Mark VI has a straight-grained back and figured sides - very landscape-like.

z
 

zzwerzy

Junior Member
Joined
Oct 23, 2022
Messages
10
Reaction score
14
Guild Total
3
Neat!!!! Very nice job! How does the underside of the top look without the plate in place? Are the two small holes on either side of the pins ones you drilled for steam?
Holes are preexisting and may be from a former pickup installation. Don't know about the underside, yet. Luthier used a heating plate wrapped in damp paper towels, on and off over a period of three days. No steam.
 

zzwerzy

Junior Member
Joined
Oct 23, 2022
Messages
10
Reaction score
14
Guild Total
3
Yes, those holes were for under-saddle pickup wiring. Why there are two of them ... Whatever the reason, they will be plugged along with the other twelve holes.

The new bridge will be split-saddle: 1-4 on one, 5-12 on the other, and a legacy Highlander beneath each.

z
 

chazmo

Super Moderator
Gold Supporting
Joined
Nov 7, 2007
Messages
26,165
Reaction score
7,560
Location
Central Massachusetts
Don't want to dissuade you, z, but you may affect resale value if you do that with the bridge/saddle...

Having said that, you're making it "your own," and I have no problem with that.
 

zzwerzy

Junior Member
Joined
Oct 23, 2022
Messages
10
Reaction score
14
Guild Total
3
haha figgured that would raise an eyebrow or two ... We'll see how it turns out.

A player first, a purist - not so much.
zzwerzy
 
Top