3 prong plug for 99J

AcornHouse

Venerated Member
Joined
May 22, 2011
Messages
10,281
Reaction score
7,442
Location
Bidwell, OH
Guild Total
21
Just scored a 99J on eBay. (Sorry to any others LTGers whom I outbid)

Assuming everything works as advertised, the only thing I know I'll definitely have to do is change the old 2-prong plug for a grounded 3-prong.

Any good articles about doing the switchover either on the forum (did a search, but didn't find anything) or off site? I have a friend who can do the work if it's not over the top. Otherwise I'll have to make the 2-hour trek to the nearest amp specialist.

Thanks
 

silverfox103

Senior Member
Joined
Jun 10, 2010
Messages
1,739
Reaction score
527
Location
Littleton, NH & St Simons Is. GA
Besides a 3 prong plug, you need a 3 conductor rubber cable, should be at least a #14 size wire. The green wire goes to the ground prong, which is by itself. On the amp end, ground it to the metal chasis with a crimp type lug. The white wire goes to the larger of the two remaining prongs on the plug and connect it to where the old white wire was terminated. And finally connect the black wire to the smaller prong on the plug and connect the other end to where the old black wire was connected.

It is easy enough to do, but if you don't feel comfortable doing it or are unsure, have a qualified electrician do it. No need to drive two hours to an amp repairman.

Tom C.

Guitar player--50 years
Master Electrician--40 years
 

capnjuan

Gone But Not Forgotten
Joined
Nov 29, 2006
Messages
12,952
Reaction score
4
Location
FL
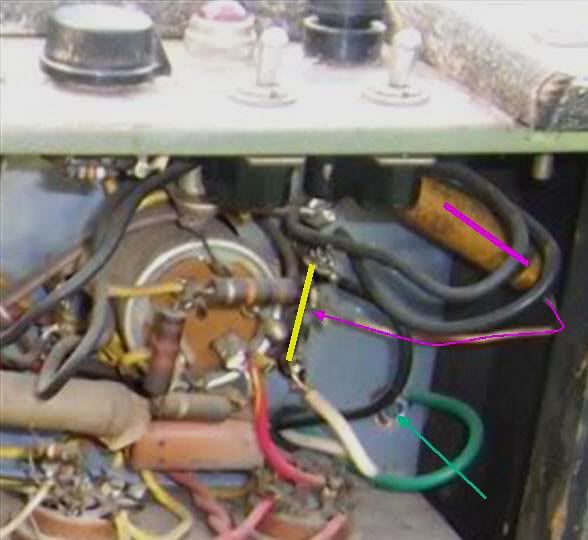
Hi Acorn House and congratulations on your new-to-you 99J! Tom has the layout pretty much right on. The pic below - from a 66J - if yours still has it's original can cap is what you are likely to see: there's a wiring strip (yellow line) adjacent to the butt of the can cap where the incoming power is terminated. This amp has a new 3-wire cord and you can see that the ground is terminated on a new screw into the chassis.

Guild66Jpower.jpg


Otherwise, it's as Tom said; disconnect and reconnect black for black, white for white. The magenta line is a 110V line-to-ground 'death cap'; once the new cord is in, this goes before you turn the amp on. Were it to fail short, you'd be putting line voltage on the chassis :shock: :shock:

A couple of more points:

Strain relief: you can see that that new power cord comes in through a grommet; that's nice ... it keeps the edge of the metal from chafing the jacket ... but it will not prevent the cord from being yanked free in the event somebody stumbles over the cord or tips the amp over stressing it. The best practice here is to use a strain relief bushing that can be bought from anybody selling power cords.

The problem is that the hole is sized for a 2-wire cord and grommet - back in the day, the smaller diameter 2-wire cords typically had a knot tied in them on the component side of the chassis; good enough to prevent accidentally pulling the cord out. A new type SO or SJ 3-wire cord, including its jacket, is about the same size as the hole in the chassis; it might go through but:

- The 3-wire cord is too bulky ... there's not enough space to tie a knot in it and still keep it away from stuff that gets hot, and

- The hole isn't big enough to add a bushing which means drilling out the hole to something close to 5/8" diameter requiring a metal bit, a rat-tail file, or sacrificing a Dremel tapered reamer if you have one.

Everybody feels differently but I would not have left the amp in the pic in that condition; with a cord that could be accidentally pulled out.


DC voltage: everywhere you see a resistor on the bottom of the can cap you have DC voltage ... anything from 250V-400V of DC. That's enough to cause heart arrhythmia or stop your heart completely. If you're going to work in/around/near that cap, you have to discharge the voltage.

Best practice is to hold one lead of a low value/high wattage resistor ... 100 ohm/5 watt for example ... to each hot post while touching the other end to the chassis; hold the resistor there for 10-15 seconds, check with a meter for residual voltage, then do the next hot post. Alternatively, you can just short the cap sections out by touching the tip of a screwdriver with an insulated handle to each hot post while allowing the shaft of the screwdriver to touch the lip of the chassis; might get a big spark ... hold it there for a while, check the voltage with a meter.

Anyway; some of the ins and outs. If you don't want to fool with it, buy a cord and bushing on line and, like Tom suggested, let an electrician or even an appliance repairman do the change over. Good luck with your new amp!
 

silverfox103

Senior Member
Joined
Jun 10, 2010
Messages
1,739
Reaction score
527
Location
Littleton, NH & St Simons Is. GA
Good points added by John. As we both said, it might not be a bad idea to have an electrician or appliance repairman do it. Electricity is not a good thing to mess around with if you are not sure. I couldn't see it costing any more than $50 to do it and if you're plugged into the amp, you want it correct.

Tom C.
 

Default

Super Moderator
Platinum Supporting
Joined
Jul 30, 2007
Messages
13,637
Reaction score
3,065
Location
Philly, or thereabouts
Guild Total
11
You don't have to go crazy with the conductor size. High voltage, low current and all that. No larger than 14. Even the transformerless amps only used 18 gage. The exception would be SVT's and Marshall Majors where they were running a sextet of 6550's and were fused at 20 amps. When you cut the old cord off, check the conductor size and you'll know for sure. I checked into a chassis punch for the double d strain relief hole and it was north of 200 bucks. A file is five. ;-P
 

AcornHouse

Venerated Member
Joined
May 22, 2011
Messages
10,281
Reaction score
7,442
Location
Bidwell, OH
Guild Total
21
silverfox103 said:
Good points added by John. As we both said, it might not be a bad idea to have an electrician or appliance repairman do it. Electricity is not a good thing to mess around with if you are not sure. I couldn't see it costing any more than $50 to do it and if you're plugged into the amp, you want it correct.

Tom C.
No worries there, my friend is an electrician, and takes care of the various audio/lighting equipment in the theatre at the Univ. where I teach.
 

Bill Ashton

Senior Member
Joined
Sep 29, 2006
Messages
4,422
Reaction score
1,023
Location
North Central Massachusetts
Guild Total
4
Chris, congrats on your new toy.

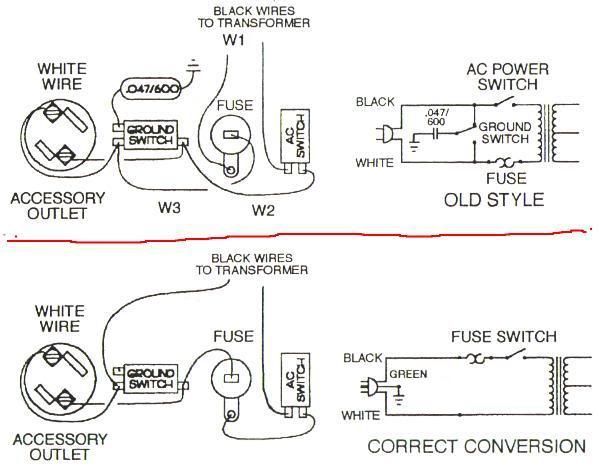
I thought I had images of mine before and after, but apparently not, so "in English"...

Changing to a new three-wire cord, the green (ground/earth) goes solidly to the chassis, use a star lock washer to keep it tight...one foot of the power transformer could be optimum.

The neutral (white) goes directly to one input wire on the transformer with no breaks...your electrician will know "You never break the neutral."

The hot goes first to the tip of the fuse holder...comes out of the waist of the fuse holder to one side of the power switch, then the other side of the switch goes to the remaining leg of the transformer. That way, if you extract the fuse and rub along the side of the holder on the way out, you don't have a fuse that is momentarily hot (on your fingers?!)

3prongconversion.jpg


This diagram came from "Uncle Spot's" site I believe...note here the ground switch is really diabled, though your 99-J doesn't have that switch.

As the Cap'n said, the "Death Cap" attached to the hot side comes out. Will work well as a tone control capacitor in a guitar should you need same...

I didn't use anything as heavy as #14 on mine, probably #18 or #16 at most, light might be easier for you to coil...and the electrician to work with.

Good luck and have fun with her!
 
Top